Originally published at: https://blog.particle.io/2019/06/26/get-started-with-ble-and-nfc/
When building IoT solutions, it’s often ideal to have options for connectivity, both in how devices communicate with the outside world, and between each other on a local network. For general, wide-area connectivity, Particle provides devices with support for Wi-Fi (the Argon and Photon), cellular (the Boron, Electron and E Series), and ethernet (any 3rd generation device and Ethernet FeatherWing).
For intra-device communication, Particle Mesh is a new and exciting way to set-up local networks of devices that can work together to solve a problem. As it turns out, Particle Mesh isn’t the only way that 3rd generation devices can share data over short distances.
With the latest release of the Particle Device OS, available today, it’s possible to use Bluetooth Low Energy (BLE) and Near-Field Communication (NFC) to communicate with Particle devices from mobile phones, and even other BLE and NFC-capable devices. In this post, I’ll show you how to use both the Particle BLE and NFC APIs to obtain a battery charge reading from a Particle Xenon.
Start with the BLE basics
Gen 3 devices (Argon, Boron, and Xenon) all support Bluetooth out of the box. In fact, all Gen 3 devices uses Bluetooth during the device configuration process in the Particle mobile app. Starting today, you can use the same Bluetooth Low Energy (BLE) capabilities built into Gen 3 hardware and the Particle Device OS in your own apps.
For those unfamiliar, BLE is a wireless personal area networking technology that was designed to enable communication between devices at moderate distances (~100 meters), while consuming less power than Bluetooth classic devices. This makes BLE perfect for mobile, wearables, and low-power device scenarios.
Using BLE for inter-device communication
BLE is a robust, full-featured, and an admittedly complex technology. There are a number of ways that you can use BLE to communicate between mobile apps and devices, or between multiple devices. The Particle Docs provide an exhaustive overview of BLE capabilities, device roles and APIs. There are also a number of great sample apps that illustrate the various ways you can use BLE in your apps.
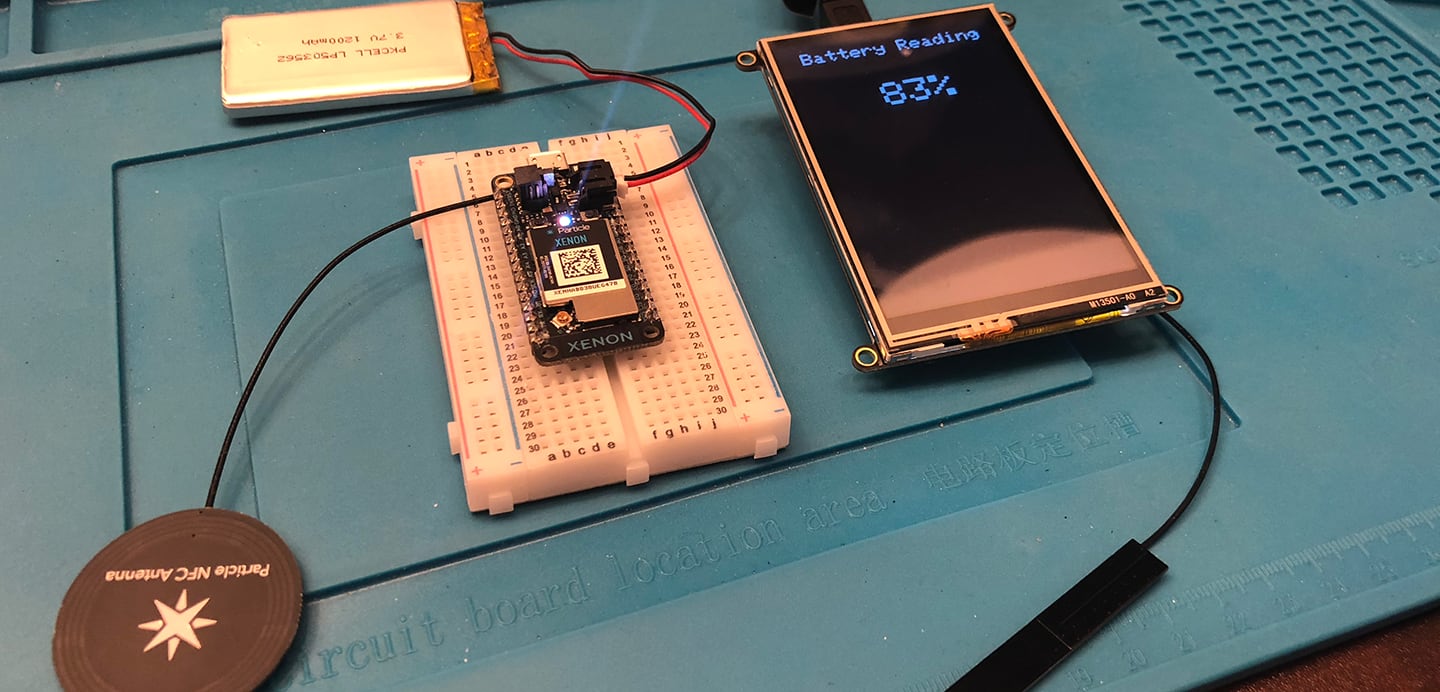
For this post, I wanted to build a simple solution with two Particle devices:
- (1) Particle Xenon
- (1) Particle Argon
- (1) NFC antenna — to be used with the Xenon
- (1) Adafruit 3.5″ TFT FeatherWing display — to be used with the Argon
- (1) LiPo battery
These devices are not on the same mesh network, but I can use BLE to enable communication between them. The Xenon reads the current voltage of its connected LiPo through the BATT pin and converts the value to a charge percentage.
battVoltage = analogRead(BATT) * 0.0011224 / 3.7 * 100;
Advertising Battery readings from a Particle Xenon
Once I have this value saved in a global variable, I can configure my Xenon to “advertise” this value. In the context of BLE, advertising means that the device simply broadcasts the value for any in-range BLE device to read. The way you advertise is by creating an array buffer that contains our voltage data, as well as some flags, modes and type settings that are needed to ensure a proper handshake between devices. Each entry in the buffer is a byte that will be used on the receiving end to determine what kind of data the advertising device is sending, and how to read it.
The all caps values in the snippet below are enum values provided by the Device OS API. If you’re using Particle Workbench, you can inspect these values by hovering over them, or by using the “Go to definition” or “Peek definition” commands.
Viewing BLE API flag sources in Particle Workbench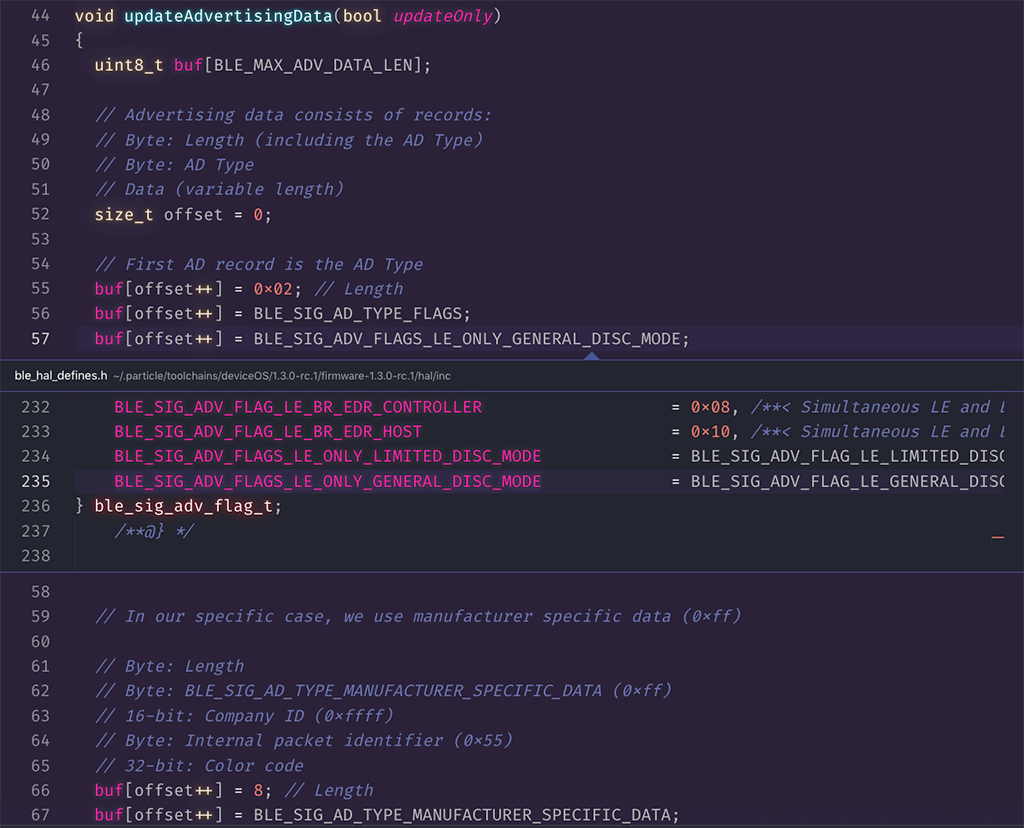
void updateAdvertisingData(bool updateOnly)
{
  uint8_t buf[BLE_MAX_ADV_DATA_LEN];

  size_t offset = 0;

  // Company ID (0xffff internal use/testing)
  buf[offset++] = 0xff;
  buf[offset++] = 0xff;

  // Internal packet type. This is arbitrary, but provides an extra
  // check to make sure the data is your data, since we use the 0xffff company
  // code.
  buf[offset++] = 0x55;

  // Copy the battery voltage into the buffer
  memcpy(&buf[offset], &battVoltage, 4);
  offset += 4;

  BleAdvertisingData advData;
  advData.appendCustomData(buf, offset);

  if (updateOnly)
  {
    // Only update data
    BLE.setAdvertisingData(&advData);
  }
  else
  {
    BLE.setAdvertisingInterval(130);
    BLE.advertise(&advData);
  }
}
You’ll notice that I also use two bytes in the buffer to specify a company id, and a single byte to designate the packet type. All of these are arbitrary values I set for testing so I can distinguish the source of the BLE packets on the receiver side. Once I added this metadata into my buffer, I can copy in the voltage reading, and configure BLE to advertise the reading.
The updateOnly boolean allows me to use this function to do the initial setup and advertising by calling setAdvertisingInterval and advertise from my setup function, and only update the data using setAdvertisingData when called from my loop function.
void setup()
{
  battVoltage = analogRead(BATT) * 0.0011224 / 4.7 * 100;

  updateAdvertisingData(false);
}

void loop()
{
  if (millis() - lastUpdate >= UPDATE_INTERVAL_MS)

    lastUpdate = millis();
    battVoltage = analogRead(BATT) * 0.0011224 / 4.7 * 100;

    updateAdvertisingData(true);
}
Reading battery status from a Particle Argon
Once I’ve built and flashed the above code to my Xenon, I can add code to my Argon to read it. Since my Argon is plugged into an Adafruit TFT FeatherWing, I can display the reading from the Xenon on the screen, giving my a nice, compact, Particle-powered Battery power meter!
First, I’ll add some imports and configure the TFT screen in my setup function shown below.
#include "Adafruit_GFX.h"
#include "Adafruit_HX8357.h"

#define TFT_DC D5
#define TFT_CS D4
#define STMPE_CS D3
#define SD_CS D2
#define TFT_RST -1

Adafruit_HX8357 tft = Adafruit_HX8357(TFT_CS, TFT_DC, TFT_RST);

const size_t SCAN_RESULT_MAX = 30;
BleScanResult scanResults[SCAN_RESULT_MAX];

float lastVoltage = 0.0;

void setup()
{
  tft.begin();
  tft.fillScreen(HX8357_BLACK);
  tft.setTextSize(3);
  tft.setCursor(30, 20);
  tft.setTextColor(HX8357_WHITE);
  tft.println("Battery Reading");
}
Then, in my loop, I’ll use the BLE APIs to scan for advertising devices and put those results in a BleScanResult object. Then, I’ll loop over each record in the result and get the data sent by the advertiser.
Recall from above that this is the byte array buffer that I stuffed with some metadata and the voltage reading. On the receiver end, I’ll inspect these values to make sure they match with what I set on the receiver (like the test company id values) before copying the voltage value from the buffer into a local value.
Finally, I do a check against the last voltage value I received so that I only update the screen when the value has changed and if it’s a new value, write it to the display.
void loop()
{
  BLE.setScanTimeout(50);
  int count = BLE.scan(scanResults, SCAN_RESULT_MAX);

  for (int i = 0; i < count; i++)
  {
    uint8_t buf[BLE_MAX_ADV_DATA_LEN];
    size_t len;

    len = scanResults[i].advertisingData.get(BleAdvertisingDataType::MANUFACTURER_SPECIFIC_DATA,
                                             buf, BLE_MAX_ADV_DATA_LEN);
    if (len == 7)
    {
      // This is the dummy company id and data type we set from the advertiser
     if (buf[0] == 0xff && buf[1] == 0xff && buf[2] == 0x55)
     {
        float voltage;
        memcpy(&voltage, &buf[3], 4);

        if (voltage != lastVoltage)
        {
          lastVoltage = voltage;
          tft.fillRect(0, 60, 240, 100, HX8357_BLACK);
          tft.setTextSize(6);
          tft.setCursor(120, 100);
          tft.print((int)voltage);
          tft.println("%");
        }
      }
    }
  }
}
Once I flash the code above, I’ll see battery readings show up on the display!
Xenon Battery Level, delivered through BLE and shown on an Argon-powered TFT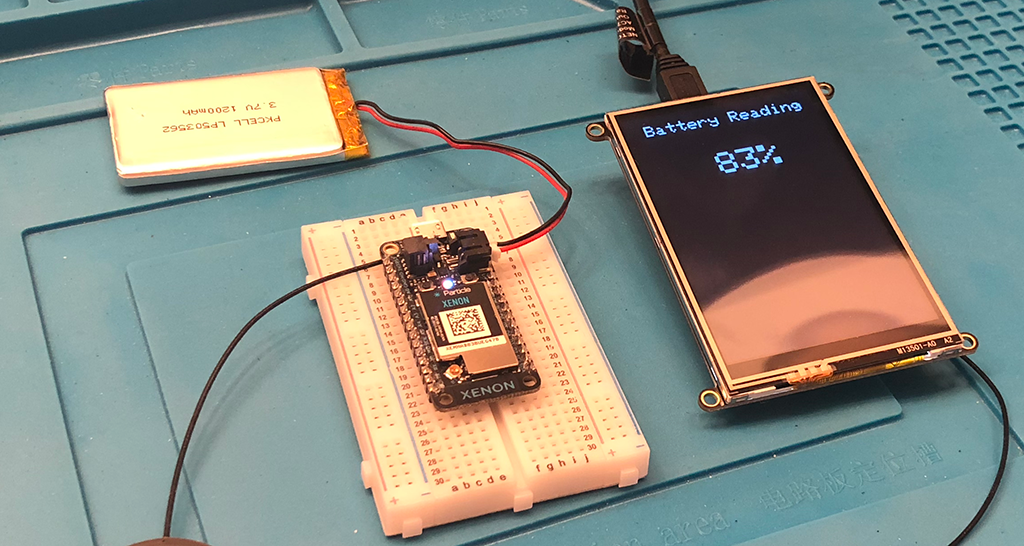
Now, let’s take a look at NFC, and extend the demo to allow a mobile phone to also read the latest battery charge level from my Xenon.
Getting familiar with NFC
Near-Field Communication (NFC) is a collection of communication protocols that enable two devices to communicate with one another over very short distances (~4 cm or less). It’s commonly used in contactless and mobile payment systems, and most modern mobile phones have an NFC reader built-in.
All Particle 3rd Generation devices contain an NFC Tag that can be programed to send links, arbitrary text, or launch apps on Android devices. For this post, I’ll update my Xenon firmware to send the battery charge when read by an NFC reader like a mobile app.
Using NFC to query devices for info
In order to use NFC with Particle 3rd Gen devices, you’ll need an NFC antenna, which is available in the Particle store. Once you have an antenna on hand, you’ll want to connect it to the NFC antenna U.FL connector on the bottom of the device. Note that this is different than the Wi-Fi, Mesh and Cellular U.FL connectors on the top of 3rd Gen devices.
Once the antenna is connected, you can update the Xenon firmware to allow the battery charge to be read via NFC. In the setup function, you’ll turn the NFC tag on, use the setText method to set a string to share with NFC readers, then call the update method to update the tag with our text.
NFC.on();

NFC.setText("Battery voltage: " + String(battVoltage, 2) + "%", "en");
NFC.update();
To ensure that the NFC tag always sends the latest battery value, you’ll also add the last two lines above to our loop function, in the interval check you’re using to update the BLE advertisement:
NFC.setText("Battery voltage: " + String(battVoltage, 2) + "%", "en");
NFC.update();
And that’s all you need to do for NFC. Once you’ve updated your Xenon, open an NFC Reader app on your iPhone or Android device and start a scan. Tap the NFC antenna on your Xenon and you’ll get a response with the latest battery reading!
For the complete code used in this example, go h here for the Xenon code and here, for the Argon code.
When should I use BLE and NFC?
In this post, I shared a simple example of how you can use BLE and NFC to enable Particle devices to share data, both with other devices and mobile phones. BLE and NFC capabilities are a great addition to the existing Wi-Fi, Cellular, and Mesh capabilities of 3rd generation Particle devices, and I encourage you to try them out for yourself. Here are a few examples of use cases where each might provide useful:
- Use BLE when you want devices to share data with other BLE devices even when those devices aren’t connected to the same network.
- Use BLE when you want your Particle devices to communicate with other BLE sensors like heart-rate monitors, or environmental sensors.
- Pick NFC when you want Particle devices to share sensor data nearby mobile apps.
- Use NFC to launch your Particle-powered mobile app experience on Android phones.
- Use NFC to share links to docs, guides and other web-based resources related to your Particle-powered apps.
The cases above are just a few examples of the kinds of apps you build with BLE and NFC. What ideas or suggestions do you have for incorporating these technologies into your Particle-powered projects? Let me know if the forum or in the comments below the post.