I’m working on building a web enabled remote control for our window AC units. Thanks to AnalysisIR I have a basic sketch that lets me send arbitrary NEC IR codes via the core (github). The IR controls are fairly limited though, on/off is a toggle and setting the temp is done via increment/decrement codes.
Opening up the AC unit I’ve verified I can use an optoisolator to read the status of the power LED with the core. I was hoping for an easy to read pinout on the 2 digit 7 segment display but it is a 10 pin package. I’m assuming that the pinout is something like the image below but I won’t know for sure until I get a chance to use a scope on it.
So with all that, does anyone have any ideas on how I can read the state of this display via a core? I guess it will depend on what frequency the display is getting switched at. My only idea so far is to listen to ds1 and ds2 via interrupts and read the state of the segment pins in the interrupt method. My guess is that approach will depend on how fast the chip controlling this display is switching between digits.
While it’s likely that the display is directly driven by a µC, there might also be a dedicated driver chip that gets the actual number to translate for the display, which you might also be able to acquire.
Maybe you could provide a photo of your PCB to see if.
The shift register (SN74HC164N) on board might be a good place to have a look at with the oszillograph.
Pin 1 should provide you with the serial representation of the digit to display.
In connection with pin 2 (B) and pin 8 (CLK) you should be able to sync on it and with your ds1/ds2 you can distinguish between digits.
Thanks for all the advice I’m actually making progress! I used my bitscope to figure out how the shift register was being used. It appears to update the state of the register very quickly (the whole update takes ~200µs) every ~3ms. For a given display state a set of 6 “bytes” is repeated over and over.
Using the interrupt features I was able to put together a little program that dumps out the data being fed into the shift register. It isn’t 100% reliable in picking up the 6 bytes but I should be able to capture multiple samples and just use majority that match up.
Next is to sit down and capture codes for a bunch of different states and see if I can figure out which bits do what in controlling the display. Somehow these 8 outputs are controlling 6 status LEDs and the 10 pin numeric display.
Just a few tips that might help to increase the reliability of your readings and speed up your ISR
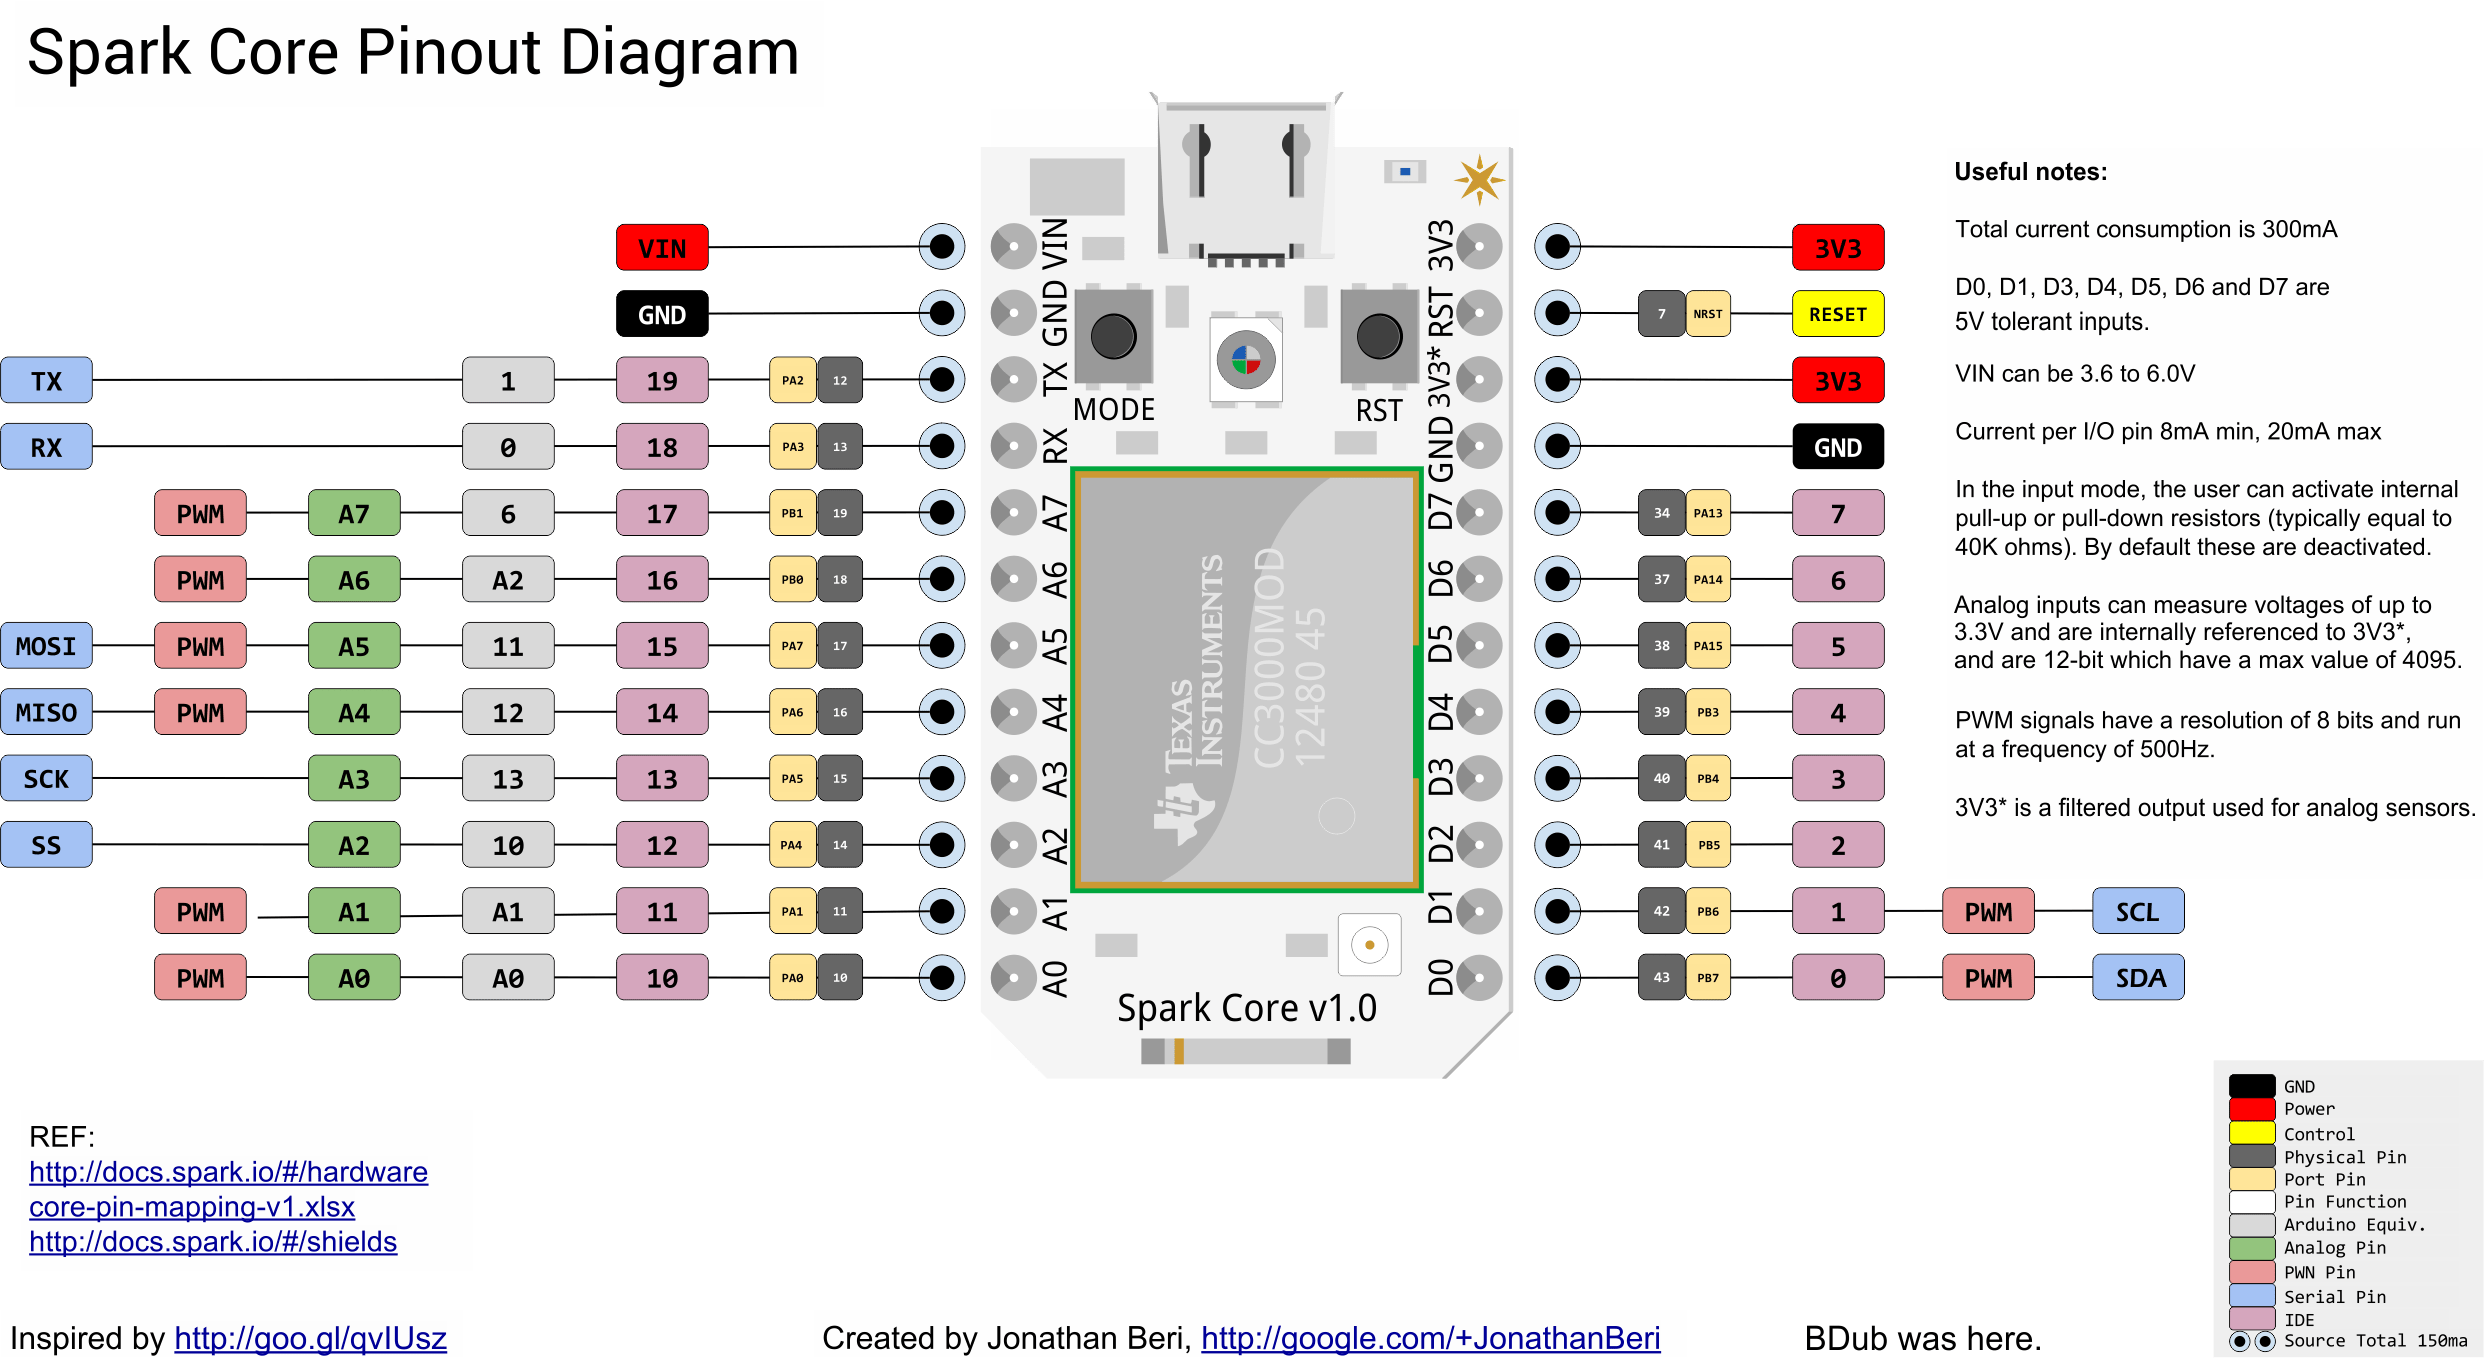
If you really want speed and don’t mind to loose 1:1 portability from Core to Photon, you can do a full port read (input = (GPIOB->IDR) & 0b01000000; - portB bit6 = D1).
Instead of using an array and an index you could just use a pointer and directly push that on instead of incrementing the index and then using it as offset to the array - especially when doing this multiple times with volatiles.
Make your pointer a uint8_t* than you can drop the line shiftRegBuffer[registerCount] &= 0x000000FF;
Pull the initialisation/clearing of your shiftRegBuffer out into loop().
No speed, just geekyness ;-): shiftRegBuffer[registerCount] <<= 1;
@edalquist, great advice (as usual) from @ScruffR. Typically on multi-digit seven-segment displays, the digits are “scanned” from left to right or right to left. Each digit has a common cathode or anode for all segments. So one digit’s common pin is enabled and the segments are output, then the next digit and so on. If this is done at a rate exceeding 30Hz, the human eye will not see any flicker.
So, look for cascading (mutually exclusive|) select pins and those will be your digit enable pins (common cathode or anode). The rest will be your seven segment and a decimal point (if used). Hope that helps!
Thanks for the tips @ScruffR I’ll give those a try tonight. I had tried using a unit8_t instead of masking earlier and ran into compilation problems, I’ll give that a try again and see if I have more luck.
Is there any good reference/reading on the threading and memory model for the these chips with regards to the interaction between loop() and ISRs? Will an interrupt actually preempt code executing in loop() to run? What are the semantics of volatile on these chips? As you can see I went with the overly cautious “mark everything volatile” approach.
I had a few minutes this morning to grab a little bit of data and am building a spreadsheet to try and decode what is being sent.
Two of the bytes appear to be the numeric values of the 1s and 10s digits on the display and while I can correlate the two values manually I’m not seeing anything in this data that looks like a digit selector bit. Maybe I can go through with my scope and try to figure out the display/register pin mappings.
Sure thing, the bit after the semicolon is a comment, hence it’s not included in the code-formatted part of the term inside parentheses.
Not easy to spot, but the difference is there
If you look here (which is in the docs), you see the yellow boxes with something like PB6 in it - this denotes GPIO-port B (GPIOB) and 6 is the bit number of that pin on that port - but ->IDR (input data register) is some insight we need to keep up our sleeves only for special users
Yes, interrups do (obviously) interrupt the normal prigram flow, unless interrupts are masked/deactivated.
I believe I had just declared my register array as a volatile unsigned unit8_t instead of an unsigned int and I then got some error about the variable not being visible. I’ll reproduce it tonight when I get home.
The board has 9 wires coming from the primary controller in the AC unit so I would guess that those are somehow contributing to the digit select and probably other display features in addition to reading button states. The good news is if the pattern I’ve observed so far for the 6 bytes holds true I don’t really need the digit select state to read the data.
One annoying thing I found early on is that whatever is driving the shift register doesn’t always clock in the same number of bits. I’ve observed anywhere from 4 to 16 clock cycles during a refresh of the register before it gets to a steady state (for 3ms).
And thanks for the clarification on interrupt behavior, embedded C is a new world for me and it is making me second guess all of my higher level threading/concurrency experience.
Thank you for all the tips and help @ScruffR! I refactored my code using your suggestions and the data I’m reading is much more stable now.
If you have a minute I would appreciate a sanity check on my use of memcpy on the volatile byte array. I’m assuming that because I’m turning off interrupts and all writes are volatile the cast to a const uint8_t* isn’t going to make me run into issues with memcpy reading cached data. It appears to be working now but well memory model/concurrency issues aren’t exactly reliable or repeatable.
As for the data it appears that 2 bytes are constant in all states, even when the unit is off 7F7F gets sent, for my purposes I’m going to treat these as a header since it makes my life decoding the rest of the data a lot easier in code.
byte 3 - 10s digit segments, a low value means the corresponding segment is lit. The display has a decimal point for each digit so all 8 bits are actually used
byte 4 - 1s digit segments
byte 5 - The 3 Mode and 3 Fan Speed LEDs, again a low bit means the corresponding LED is on
byte 6 - Always FD when the unit is on and FF when it is off, no change other than that.
Even though I don’t know exactly how the display is being driven (assuming DS1/DS2 are coming from one of the other control lines running to the board) this is more than enough information to easily read the current display status of the unit.
And now I’ve run into a problem. Everything works great IF I have the core hooked up via USB. If I have it self-powered “something” isn’t working right. I haven’t had a chance to debug what isn’t working right but as far as I can tell somehow not having the serial port connected seems to be causing the problem.
@edalquist, that looks all fine to me (no warranty, tho’ ;-))
The use of a working copy of your byteBuffer is a clever move
One minor “trick” which the optimizer might do anyhow:
// instead of
if (((GPIOB->IDR) & 0b01000000) == 0b01000000) { ... }
// you can just do
if (((GPIOB->IDR) & 0b01000000)) { ... }
// since anything not 0 will be treated as true anyhow
BTW: volatile is mainly a thing affecting read instructions rather than write.
Edit:
Serial should not make any difference, but I’ll have a think too.
Could it be your power supply?
I dug into it a bit more and it doesn’t appear to be power related. Powering the Core off the 5V rail of the AC unit or from a 4xAA battery pack (measures 5.25V) both exhibit the same behavior. Running off USB fixes whatever the issue is.
To be safe I even tried replacing my memcpy with a little for loop to copy from the volatile array without the cast.
Since I can’t use serial to dump status without USB I upped my loop sleep to 30s and just publish the current 24 byte buffer as an event. I captured a few events from running on AC power, USB power, and batter power. You can see the USB data is a nice consistent 6 byte repeating pattern where as the AC and battery modes are very noisy.
Edit: I even tried commenting out all Serial. calls in the code and am getting the same result. It works when running off USB and fails when running on battery or AC rail power to VIN. Running on a USB battery pack also displays the same “bad data” behavior.
So as far as I can tell:
source of the power is not a cause
having Serial.begin/Serial.print lines in the code or not in the code has no effect
The ISR is only behaving correctly when the core is connected via USB to my laptop
Just a stupid question: Have you tied the ground of your battery pack to the ground of the circuit you’re measuring?
When powering off the AC unit you have to ensure a nicely clean filtered DC supply for the Particle - if in doubt take an oszillogram. Noisy DC might kill your on-board regulator!
make sure ALL grounds are tied together with the shortest possible wire
I recommend adding 0.1uF caps between Vin and GND at the Photon and near the level shifter. Also, add a 100uF between Vin and GND where power comes in to the protoboard. Do this even if powering off batteries.
Make the wires connecting the boards as short as possible. If this is not possible, a twisted pair with one wire to GND on both side is a good idea.
Noise is a strange critter and it can be difficult to capture. Practicing good decoupling methods is always a good first approach.
As for powering from the AC unit, you assume that it can supply the necessary current which may not be correct. I would stick to powering from batteries and get that working first, at least IMO
Good point on the using the AC’s power, I naively assumed it would just work. Beyond figuring out what is driving that 5V rail is there any way to really verify that the AC’s 5V line is safe to use?
I’ll add the filtering capacitors tonight and see what I can do about shortening the leads. I’ll also draw up a schematic so it is easier to talk about the circuit. Is Fritzing the easiest way for an electronics newb to draw something like this?
Also thanks for all the help, the community here has been amazingly helpful.
@edalquist, I would not depend on the AC unit’s 5V power whatsoever. Products are usually designed to tight specs. Without seeing schematics, it would be hard to assess their PSU’s capacity.


