Hi folks,
I’m a novice and I’m struggling with this simple code.
I have similar code running on a Xenon and it’s working fine. But when I run it on the Boron, it breathes cyan but stops responding to pings and stops doing it’s gateway function. I have to reset it to safe mode in order to reflash Tinker and get it back running again.
The difference between the code below and the working Xenon code is that I’m using the fuelGage function here, but I’m using “analogRead(BATT)” on the Xenon.
Can someone point me in the right direction? Thank you!
///  BORON SOLAR EXPERIMENTS  ////

double voltage;
double soc;

//////////////////////////////// SETUP SECTION (RUNS ONCE)  //////////////////////////////////////////

void setup() {

    Particle.variable("voltage", &voltage, DOUBLE);
    Particle.variable("soc", &soc, DOUBLE);

    Particle.connect();

}

/////////////////////////////MAIN LOOP (LOOPS CONTINUOUSLY)  ///////////////////////////

void loop() {

       delay(10000);   //Don't send too often

     // Read the sensors
       FuelGauge fuel;
       voltage = fuel.getVCell();
       delay(500);
       soc = fuel.getSoC();

     // Convert doubles to a string that can be published
        String voltageS = String(voltage);
        String stateOfChargeS = String(soc);

     // send to webhook
        Particle.publish("B_voltage", voltageS, PRIVATE);
        Particle.publish("B_SOC", stateOfChargeS, PRIVATE);

//        delay(50000);  //Send data about once per minute

}
Also, since you are running in defaultSYSTEM_MODE(AUTOMATIC)Particle.connect() shouldn't be called in setup().
You should also try to avoid delay() - especially 10000 or more milliseconds - in loop().
Rather go with something like this
void loop() {
static uint32_t msDelay = 0;
if (millis() - msDelay < 10000) return; // bail out when time isn't due yet
msDelay = millis();
// do the work when it's time to
...
}
I think these extensive delays are actually causing the apparent loss of connectivity where it's actually only degraded responsiveness due to starving the system process of processing time.
I'd also rather use a global FuelGauge fuel; and reuse that over and over, than constructing/destroying it each time anew.
And finally, instead of two separate events I'd wrap both values in one string and send that
e.g. as JSON string that can easily be parsed by the webhook
Thanks so much for taking the time to look at this. I will implement the changes and test.
I like the idea of combining publishes in one. But even after googling “snprintf” I have no idea how you came up with all of the syntax to make these lines:
To best learn about snprintf() you should first look up printf() which expains the basics. snprintf() only differs in two points, it dosn’t directly print to an output channel but into a buffer (that’s the s part for store) and the n part referes to a limited number of bytes to store.
But to cut things short, my statement above just injects the values into a string {"Voltage":"...", "SoC":"..."} where the ellipses (...) are replaced with the respective floating point number with one decimal place (%.1f).
The “funny” way to embed double quotes in a string which in turn is also wrapped in double quotes is called escaping ("this string contains two \"embedded\" double quotes").
Could you post your working code? I am running into the same issues that you were, but am not having any success. After I flash my device, I am also not able to re-flash it until I put it into safe mode.
I am running 8.0.rc.26 on my Boron
Here is my code:
/// BORON SOLAR EXPERIMENTS ////
double voltage;
double soc;
//////////////////////////////// SETUP SECTION (RUNS ONCE) //////////////////////////////////////////
void setup() {
    Particle.variable("voltage", voltage);
    Particle.variable("soc", soc);
Particle.publish("Setup complete");
}
/////////////////////////////MAIN LOOP (LOOPS CONTINUOUSLY) ///////////////////////////
void loop() {
// Read the sensors
Particle.publish("Loop started");
FuelGauge fuel;
Particle.publish("About to read V");
voltage = fuel.getVCell();
Particle.publish("About to delay");
delay(500);
Particle.publish("About to get SoC");
soc = fuel.getSoC();
// Convert doubles to a string that can be published
String voltageS = String(voltage);
String stateOfChargeS = String(soc);
static uint32_t msDelay = 0;
if (millis() - msDelay < 10000) return; // bail out when time isn't due yet
msDelay = millis();
// do the work when it's time to
  char evtData[64];
  snprintf(evtData, sizeof(evtData), "{\"Voltage\":\"%.1f\", \"SoC\":\"%.1f\"}", voltage, soc);
  Particle.publish("B_Data", evtData, PRIVATE);
}
The last message that I see some through is: “About to read V”.
So it looks like the device is hanging on voltage = fuel.getVCell();
So I am not 100% that I am doing this correct… Basically, I have the code in the WEB IDE, then I select Devices on the left, then I can see my unit. At that point, I select version 27 from the dropdown list. At that point, I click the flash button to send over my code (posted above). I see a strange flash sequence, then its back to the “breathing blue”. Still at .27
Any thoughts as to what I am doing wrong? I am starting with the unit in safe mode. This is all OTA…
This is what has been running successfully for a while now (weeks). It is only sending the battery voltage and state of charge % to a webhook (which I then send to emoncms for graphing etc but you don’t need that step).
It sends every 5 minutes, and increments a “watchdog” counter by 5 so the particle variable “watchdog” lets me know how long it’s been since the Boron has rebooted, in minutes.
I am not a veteran programmer, so there may be poor syntax in this example! It does seem to work however.
///  BORON SOLAR EXPERIMENTS  ////

double voltage;
double soc;
int watchdog;

FuelGauge fuel; //wake up the battery monitor routines

//////////////////////////////// SETUP SECTION (RUNS ONCE)  //////////////////////////////////////////

void setup() {

    Particle.variable("voltage", voltage);
    Particle.variable("soc", soc);
    Particle.variable("watchdog", watchdog);

    PMIC power;
    power.setChargeVoltage(4208);  // charge the battery to 4.208 volts instead of default 4.112 V

}

//////////////////////////////// MAIN LOOP (LOOPS CONTINUOUSLY)  ///////////////////////////////////////

void loop() {

     // read sensors and send data every 5 minutes
  static uint32_t msDelay = 0;
  if (millis() - msDelay < 298000) return; // bail out when time isn't due yet  // 5 MINUTES INTERVAL
        msDelay = millis();

     // Read the sensors //
       voltage = fuel.getVCell();
       soc = fuel.getSoC();

     // Convert doubles to a string that can be published
        String voltageS = String(voltage);
        String SocS = String(soc);

     // send to emoncms thru webhook
        Particle.publish("BoronVoltage", voltageS, PRIVATE);
        delay(1000);
        Particle.publish("BoronSOC", SocS, PRIVATE);

     // Increment watchdog timer
        watchdog = watchdog + 5;
            if (watchdog > 32000) {
            watchdog = 100;   // reset the watchdog to avoid overflow
            }


}
Jeffpeakmonitor,
Thanks for the code! I just flashed my device with your code, and BAM! Its working! I was worried that I was having issues with the hardware, but looks fine!
Ill let this run for a day or two and add the solar panel to the system tomorrow morning.
ScruffR,
I thought about that, but I don’t think think that was the cause. The device would never recover and also would not allow a re-flash until I put the device into safe mode.
I’d still avoid hitting the rate limit. Hammering Particle.publish() that much may have unexpected side effects.
Your code above is trying to publish 4 to 5 (on first run even 8) events every 500ms - that’s definetly too much and may at least contribut to other issues.
I started with a 1W 6V solar panel and a cheap 18650 battery, but it couldn’t keep up if there were any clouds or shadows during the day.
I switched to a 5V 2.5W panel from Amazon: Solar panel link
And 2 Panasonic 18650 batteries: Battery link
Now it can go a few days without solar at all, and will fully charge on an average day. This is without any sleep mode on the Boron - impressive! I look forward to when the sleep features are enabled.
Jeffpeakmonitor,
Thanks for the links! Better than some trial and error…
Last question for you… Is your panel connected directly to the Boron or are you using a charge controller? If directly connected, which pins did you use?
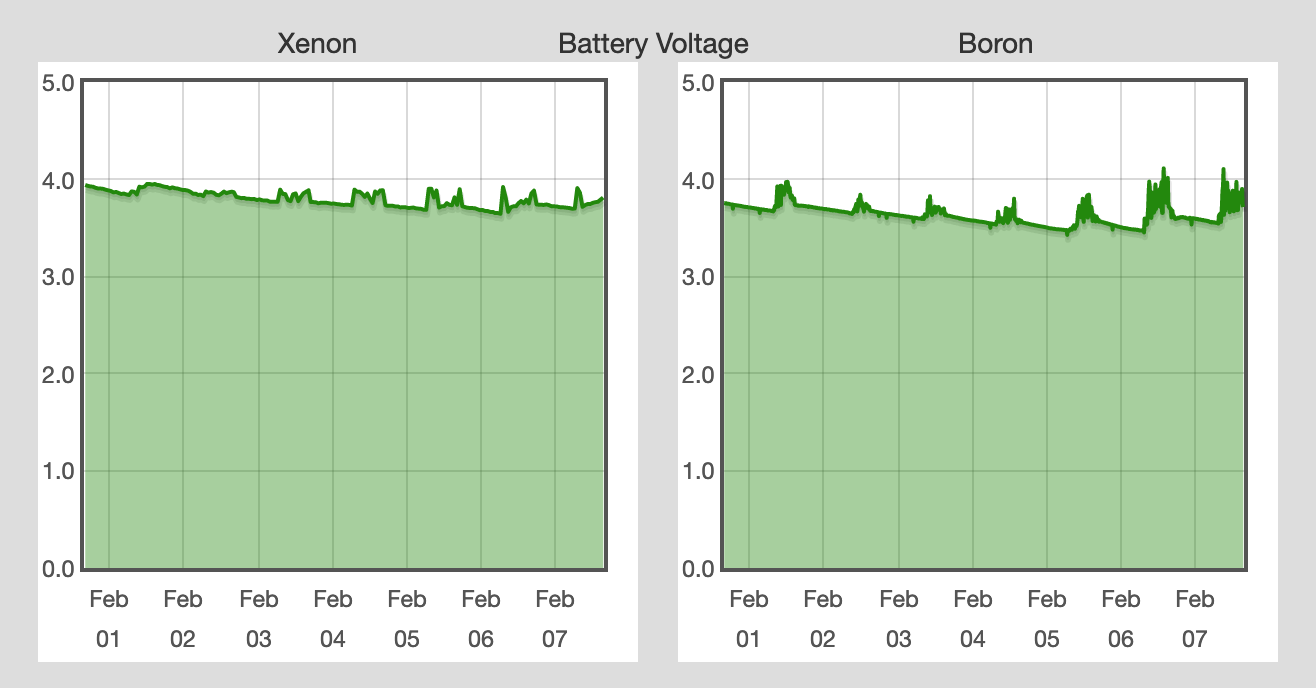
Update to the system: A 2nd 2.5W panel was added in parallel with the first one because the solar panel didn’t charge fast enough to recover after long cloudy stretches (more than 3 days). This has helped to double the charging speed during sunny times.
Here is a chart of battery voltage during a week of rain and clouds, except for the last day that was sunny: