Project Repository: https://github.com/krvarma/Particle_Alexa
Introduction
Couple of weeks back I received my Amazon Echo. First thing came to mind is to try integrating with Particle (especially after reading this post Alexa, open Spark and ... (Amazon Echo Hackathon)). Here is the project I worked.
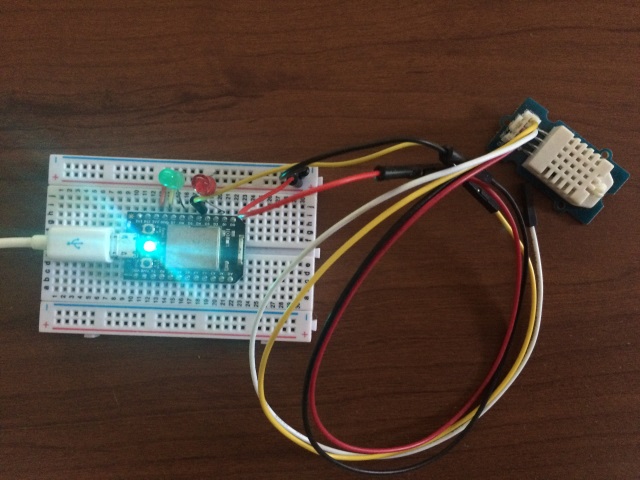
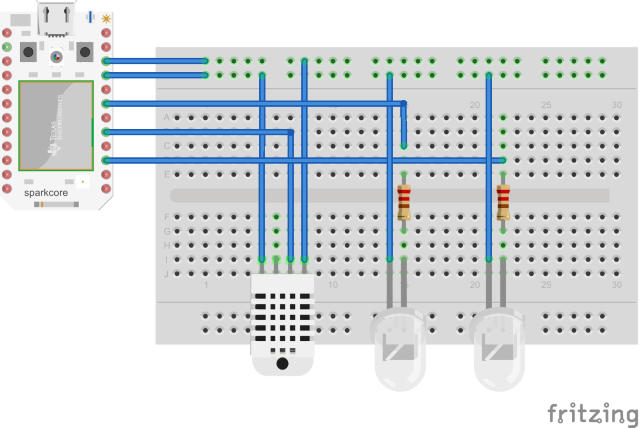
The Particle application is really simple, just read temperature and humidity from a DHT22 sensor. Also it has two functions to control two LEDs Red and Green. The firmware exposes three functions. gettmp returns temperature, gethmd returns humidity and ctrlled controls the LEDS attached to D2 and D6.
On the Amazon Echo side, we have to use Alexa Skill Set to interact with it. For this I have created one Alexa Skill Set. Following are some of the interactions possible:
One-Shot Modal
User: Alexa, ask particle, what is the temperature*
Alexa: Temperature is 30 degree
User: Alexa ask particle, what is the humidity
Alexa: Humidity is 76%
User: Alexa, tell particle to turn on red light
Alexa: OK, red light turned on
User: Alexa, tell particle to turn off red light
Alexa: OK, red light turned off
User: Alexa, tell particle to turn on green light
Alexa: OK, green light turned on
User: Alexa, tell particle to turn off green light
Alexa: OK, green light turned off
User: Alexa, open particle.
Alexa: Alexa will open the particle and speak the help text and wait for next commands. You can ask what is the temperature, what is the humidity or tell Alexa to turn on or off lights.
To create a new Alexa Skill Set, we have to create
- Service that will process the voice input
- Intent Schema that defines the actions for the voice input
- Sample Utterance file that contains all the possible voice inputs and its corresponding intent.
Below are the sample utterance and intent schema of our application:
Intent Schema
{
  "intents": [
    {
      "intent": "ParticleIntent",
      "slots": [
	{
          "name": "sensor",
          "type": "LITERAL"
        },
        {
          "name": "light",
          "type": "LITERAL"
        },
        {
          "name": "onoff",
          "type": "LITERAL"
        }
      ]
    },
    {
      "intent": "HelpIntent",
      "slots": []
    }
  ]
}
Sample Utterance
ParticleIntent what is the {temperature|sensor} here
ParticleIntent what is the {humidity|sensor} here
ParticleIntent turn {on|onoff} {red|light} light
ParticleIntent turn {on|onoff} {green|light} light
ParticleIntent turn {off|onoff} {red|light} light
ParticleIntent turn {off|onoff} {green|light} light

ParticleIntent {temperature|sensor}
ParticleIntent {humidity|sensor}
ParticleIntent {red|light}
ParticleIntent {green|light}

HelpIntent help
HelpIntent help me
HelpIntent what can I ask you
HelpIntent get help
HelpIntent to help
HelpIntent to help me
HelpIntent what can you do
HelpIntent what do you do
HelpIntent how do I use you
HelpIntent how can I use you
HelpIntent what can you tell me
As you can see our application has two intents ParticleIntent and HelpIntent. ParticleIntent is invoked when you tell the Alexa to turn on/off lights or ask for temperature or humidity. HelpIntent is invoked when you ask for help.
In the intent schema, you can see slots section. These are parameters that should be passed to you service. The values of these parameters are defined in the utterance file. In our case these are {temperature|sensor}, {humidity|sensor}, etc…
When Alexa recognize these voice input, it will invoke our service application with all the slots specified if any. You can create service application in Node.js or Java and host it on your own web server or you can use the AWS Lambda functions to host. In our case I am using AWS Lambda functions and it is written in Node.js. You can see these in the GitHub Repository.
In our application we check the slots and call appropriate functions in our firmware, if the slot sensor is temperature then we call the temperature function and send the response. Echo will speak these response.
Installation
These installation steps are taken from one of the Alexa Skill Set sample.
AWS Lambda Setup
- Go to the AWS Console and click on the Lambda link. Note: ensure you
are in us-east or you won’t be able to use Alexa with Lambda. - Click on the Create a Lambda Function or Get Started Now button.
- Name the Lambda Function “Particle”.
- Go to the the src directory, select all files and then create a zip file, make sure the zip file does not contain the src directory itself, otherwise Lambda function will not work.
- Upload the .zip file to the Lambda
- Keep the Handler as index.handler (this refers to the main js file in the zip).
- Create a basic execution role and click create.
- Return to the main Lambda page, and click on “Actions” -> “Add Event Source”
- Choose Alexa Skills Kit and click submit.
- Click on your Lambda function name and copy the ARN to be used later in the Alexa Skill Setup
Alexa Skill Setup
- Go to the Alexa Console (https://developer.amazon.com/edw/home.html) and click Add a New Skill.
- Set “Particle” as the skill name and “particle” as the invocation name, this is what is used to activate your skill. For example you would say: “Alexa, tell Particle to turn on red light”
- Select the Lambda ARN for the skill Endpoint and paste the ARN copied from above. Click Next.
- Copy the Intent Schema from the included IntentSchema.json.
- Copy the Sample Utterances from the included SampleUtterances.txt. Click Next.
- [optional] go back to the skill Information tab and copy the appId. Paste the appId into the index.js file for the variable APP_ID,
then update the lambda source zip file with this change and upload to lambda again, this step makes sure the lambda function only serves request from authorized source. - You are now able to start testing your sample skill! You should be able to go to the Echo webpage (http://echo.amazon.com/#skills) and see your skill enabled.
- In order to test it, try to say some of the Sample Utterances from the Examples section below.
- Your skill is now saved and once you are finished testing you can continue to publish your skill.
Screenshots
Demo Video

