Ubidots - Webhook - Using a Control Button

I have been making steady progress in development in large part because of the great content in these forums.

I am using Ubidots and Webhooks (not the Ubidots library). I have implemented several cloud.variables and cloud.functions and have them working smoothly.

One function will start and stop the counter and I have implemented with a cloud.function that works perfectly using these curl commands:

Start: curl https://api.particle.io/v1/devices/{device ID}/startStop -d arg=“start” -d access_token=”{access token}"

Stop: curl https://api.particle.io/v1/devices/{device ID}/startStop -d arg=“stop” -d access_token="{access token}"

I read @DRCO’s post here and the Ubidots tutorial on WebHooks here.

But, I can’t seem to get it working or to figure out how to troubleshoot it. Any advice? I think this is an issue in how to get the correct curl command into the Ubidots Webhook form. @aguspg

Thanks,

Chip

Hello,

Let me ping someone that might be able to help, @rickkas7 are you able to assist?

Kyle

1 Like

Hello @chipmc,

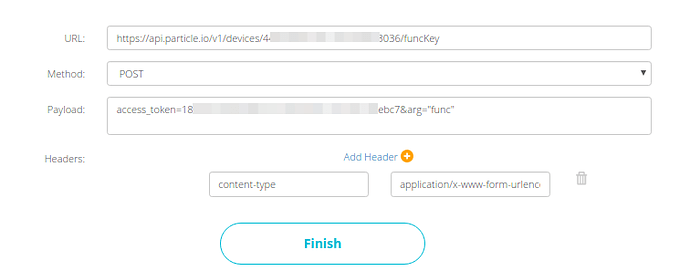
As I can see on the image you attached the token inside quotes(" ") and that’s why you’re not able to manage the webhook with Ubidots. I just made a test without the quotes and it works perfectly, please follow the structure below to build the payload:

I set up the webhook to “if the variable value is equal to 0” set the webhook:

Then goes to the Dashboard tab and create the control widget to be able to set the webhook already created.

To verify how works with my particle device with the Ubidots webhook I used the code below:

#define LED D7

void setup() {
    pinMode(LED, OUTPUT);
}

void loop() {
    digitalWrite(LED, LOW);

}

// SYNTAX
bool success = Particle.function("funcKey", funcName);

// Cloud functions must return int and take one String
void funcName(String extra) {
    digitalWrite(LED, HIGH);
    delay(1000);
}

NOTE: Take in count that the code is following my webhook configurations. Also, to make the control you have to create a other webhook, to get a better a idea of this please reference to the section “Ubidots Webhook to Particle” on our [help guide](http:// NOTE: Take in count that the code is following my webhook configurations. Also, to make the control you have to create a other webhook, to get a better a idea of this please reference to the section “Ubidots Webhook to Particle” on our help guide.

I hope this would help you,
Best Regards,
Maria C.

4 Likes

Maria C.

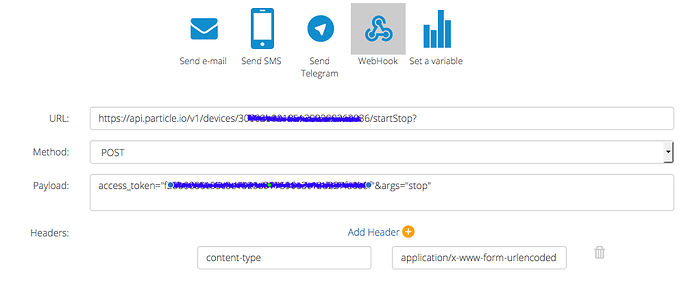
I did indeed help along with a few other tweaks which I will summarize below. The control widget now works.

So, to summarize:

  • No quotes on tokens
  • No question mark after the URL field
  • arg= not args=
  • No quotes on the argument itself - arg=stop

With these changes, all is good.

Thanks,

Chip

3 Likes

Thanks so much for sharing it with the community :smiley:

All the best,
Maria C.

3 Likes

@mariahernandez and @jotathebest

It seems like we need to update this thread and your help guide as the Ubidots interface had changed.

I have been trying to get this working without success. Here is what I have tried:

  1. I set up a function and published it in my code. I have tested this function and it works:
  Particle.function("Set-Alert",setAlert);
  ...
 int setAlert(String command) // Function to force sending data in current hour
{
  if (command == "1")
  {
    state = REPORTING_STATE;
    alertValue = 1;
    return 1;
  }
  else if (command == "0")
  {
    state = REPORTING_STATE;
    alertValue = 0;
    return 1;
  }
  else return 0;
}
  1. I was able to call this API using a curl command on my laptop. This curl command works:
curl https://api.particle.io/v1/devices/{{Particle Device ID}}/Set-Alert -d arg=1 -d access_token={{Particle Access Token}}

  1. I created an event and a control variable. I first used an SMS event to make sure the control variable was triggering the event - this worked too.

Then the wheels came off

In the new Event interface, there is no longer a “payload” field so , used “body” and formatted the event like this:

What am I doing wrong?

Thanks, Chip

Hello @chipmc,

During the last months Ubidots platform have been deploying new features to offer the best to the users. The article is already updated, but is not available yet for everyone, at the end of the day you should be able to see the guide with the new Ubidots interface.

To trigger an Ubidots Webhook to Particle, fill the empty fields with the following parameters:

HTTP Method: POST 
URL: https://api.particle.io/v1/devices/events ​
Headers: content-type | application/x-www-form-urlencoded 
Body: name=UbidotsWebhook&data={{last_value}}&access_token={Particle_Token}  

The configuration above will send the last value of a respectively variable to the Particle Cloud.

I hope this would help you, if you have any additional question let us know!

Thanks,
Maria C.

@mariahernandez,

Thank you for responding. I tried your approach exactly (changing only my token) and it does not work for me. Here are a few questions:

  1. Where in your Webhook does it specify the Device ID for the device I am sending the data to?
  2. the data={{last_value}} , how does that tie to a specific variable’s name? So I made a variable with the name “messaging” that I am toggling on a dashboard but, how does this webhook tie to that?
  3. The structure of this webhook is different than the one you posted earlier in this thread. Is it still possible to send a specific value to a specific function from a specific device as it was back then?
  4. Since I have the structure that works as a curl command, can’t I put that same content into your form?

Thanks for your help, Need to get this working for a demo tonight so your attention is appreciated.

Chip

Looping into your questions:

1. Where in your Webhook does it specify the Device ID for the device I am sending the data to?
A: The Webhook is not specifying the Device ID; the data is received in the Particle Cloud through the Particle Token (the one assigned in the body of the webhook), which the master key of your Particle Account. The Ubidots Webhook is pointing to the Particle Cloud, and the data incoming is centralized the Particle Cloud, at this point you should be able to see the data received (see below) in the console of the particle cloud.

Once the data is properly received, you should upload the respectively firmware to the device desired to obtain the data from Ubidots. For example, as you can see in the image above the Event Name is UbidotsWebhook (the one assigned in the body of the Ubidots Webhook), now you need to establish the subscription to the event configured, in this case will be the one called “UbidotsWebhook”:

void setup() {
  Serial.begin(115200);
  // Subscribe to the integration response event
  Particle.subscribe("UbidotsWebhook", myHandler);
}
​
int i = 0;
​
void myHandler(const char *event, const char *data) {
  // Handle the integration response
  i++;
  Serial.println(i);
  Serial.print(event);
  Serial.print(", data: ");
  if (data)
    Serial.println(data);
  else
    Serial.println("NULL");
}
​
void loop() {
    
}

2. the data={{last_value}} , how does that tie to a specific variable’s name? So I made a variable with the name “messaging” that I am toggling on a dashboard but, how does this webhook tie to that?

A: The {{last_value}} key returns the last value of the variable established as condition in your event. Following the example mentioned above, I created two events in order to handle the data once a variable change it’s status, the variable is called “control” and this is going to be a switch widget at Ubidots; this variable is going to provide me just two values, 1 and 0.

Once one of the events (one - if control value is less or equal to 0. two - if control value is equal to 1) is triggered the last value obtained is the one sent to the Particle Cloud.

3. The structure of this webhook is different than the one you posted earlier in this thread. Is it still possible to send a specific value to a specific function from a specific device as it was back then?
A: Yes, if you desire you can send an specific value, but take in count that the value should not have any quotes. Following the structure of your webhook you should have something like below:

Body: access_token={Particle_Token}&arg=1

At this point I highly recommend you check if the body of the webhook doesn’t have any space or special character included.

4.Since I have the structure that works as a curl command, can’t I put that same content into your form?
A: You are able to put the same content in the Ubidots Webhook, you should not have any issue with it. As I noted in the image provided by you at first, you are assigning the parameters args between quotes, probably this is causing you issue.

I hope this clarify all your doubts!

Btw, the article is already updated!

All the best,
Maria C.
1 Like

@mariahernandez,

Thank you for answering my questions and for getting the updated page published so quickly.

I guess I have a question on approach. It seems that both of these approaches are valid:

  1. The approach you outlined where Ubidots pushes data to a Particle Webhook which the Electron subscribes to.

  2. The approach where Ubidots pushes data to a Particle function that is published by an individual Electron.

Any advice on the pros / cons of these? It seems like your approach could send the same data to many devices but the 2nd approach could send data to a single device even if many had the same function. Is that the difference?

Thanks,

Chip

You will be able to send data to many devices as you desire, the thing here is that you have to establish the subscription to the event respectively. Of course, if the firmware of your device have the same event assigned it will received the same data provided through the webhook configured to the event.

All the best,
Maria C.

2 Likes