Originally published at: https://blog.particle.io/2019/03/04/upcycling-homebrewing/
New 3rd generation Particle hardware is here, and there’s a lot to love. I have an old, Photon-based project that I’ve been itching to update and add a few new features to, so I decided to see just how easy it would be to migrate a Photon-based project to the new Argon, hardware, firmware and all.
In addition to this post, you can also go behind the scenes with this build in a series of Twitch live streams I’ve recorded and posted to YouTube over the last several weeks. Here’s how I did it.
Introducing the Brew Buddy
I’m a home brewer, which is no surprise given that I live in Austin, TX. Not only is homebrewing common in these parts, but every Austin area household must have at least one homebrewer in order to claim city residence.That last statement is not true, but it should be.
I’ve been homebrewing for about eight years, and I’m drawn to it for the same reason many are: not so much for the end product but the process and chemistry of it all. As with cooking and baking, it’s fascinating to take discrete ingredients and—by alchemy—transform them into something enjoyable.
Current Brew Buddy Specs
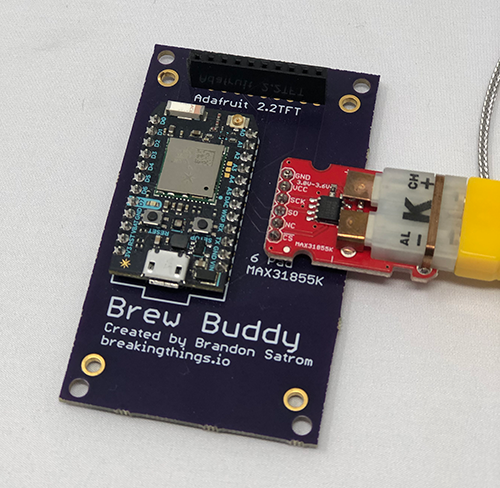
As a techie and maker, it should come as no surprise that I’ve explored ways to incorporate technology into my brewing. One example is the Brew Buddy, a connected homebrew monitoring system that tracks wort—the pre-beer mixture of water, grains, malt, and hops — temperatures during the cooking stage of the brewing process. The current version of the project includes:- A Particle Photon as the brains of the project
- One Type-K Thermocouple for measuring wort temperature
- A 2.2 in TFT display for showing temperature readings and a historical temperature graph
- A custom PCB designed in Eagle and fabricated by the fine folks at OSH Park

The original Brew Buddy build used a Photon with custom PCB.
The Photon powers and orchestrates the board, while also publishing temperature readings to the Particle cloud so that I can visualize trends from one brew to the next.
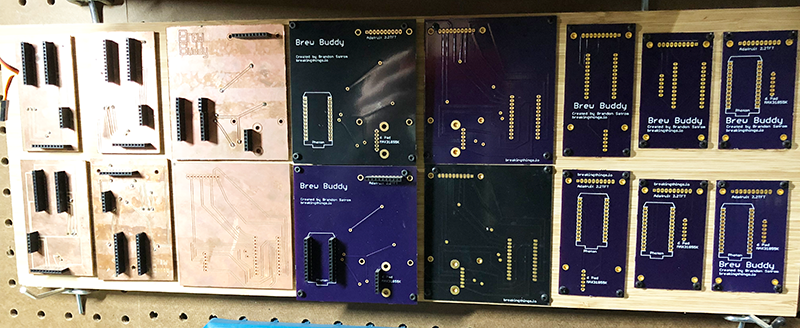
Brew Buddy began — as these things typically do — on a breadboard. Once my design was set, I CNC milled a few PCB revs (my first custom PCBs ever!) and when I was satisfied, contracted a PCB manufacturer for production. That was nearly four years ago, and Brew Buddy is ready for an upgrade.
Various iterations of the Brew Buddy custom PCB that I’ve used over the years.
I had a few ideas for things to add to the project, like a piezo-based knock sensor to detect when fermentation begins. Particle’s new 3rd generation hardware was the perfect motivation to add those features, design a new board, and explore just how easy it would be to port my project from the Photon to the Argon.
Spoiler alert: it was so easy! Like hitting that giant red office supply chain button easy.
Breadboarding a new prototype
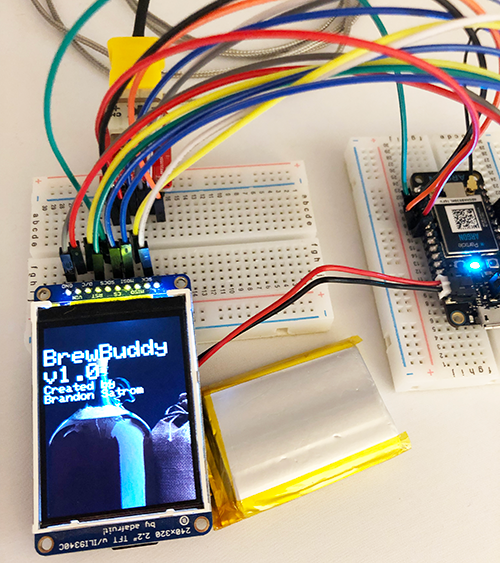
Prototyping an Argon-powered Brew Buddy began with a breadboard and jumper wires.
With any new hardware project, even when updating or swapping out components or MCUs, I like to start with a rats nest of jumper wires a breadboard prototype. This an essential step in making sure that I’ve wired everything correctly before taking the time and expense to design and order a board.
As a bonus, the tangled mess of wires plugged into tiny, nearly invisible slots serves as a pleasant reminder of my ever-increasing age as I squint darkly between wires and try to get everything in the right place.
Also, turning a mess of wires into copper traces under the solder mask is pretty amazing. It evokes the same feeling like the things in that Monday.com commercial that I find myself not skipping every time I go to YouTube to watch a video about how to beat my kids at Super Smash Bros.
My approach to Brew Buddy hardware migration
For the Brew Buddy migration, there were two steps to my breadboard prototype:- Map the existing components (the TFT and Thermocouple) to new pins on the Argon
- Add new connections for the SD Card on the TFT (so I can display bitmaps on the screen) and a thin piezo to function as a “knock sensor.”
Porting the firmware
Images showing the difference between the Photon and Argon source code changes — only three lines needed an update.
With the breadboard prototype all wired up, it was time to port the firmware. I expected that this would consist of three tasks:
- Update pin-mappings from the Photon to the Argon.
- Update firmware libraries I used, if needed.
- Add libraries and new firmware for the knock sensor and displaying Images on the TFT.
Your migration may vary...
And with the caveat that YMMV depending on the features and libraries that you’re using for an older project, I was pleasantly surprised to find that, in order to get my existing Photon-based project running on the Argon, I had to change a grand total of THREE lines of code. And all three were GPIO pin mappings for the thermocouple. You can see the diff here if you want proof.Testing the Argon-powered Brew Buddy firmware.
The majority of the work was on the physical pin-mapping side as I was setting up the prototype. Since both the TFT and Thermocouple are SPI devices, I needed to make sure the jumper wires were connected to the Argon’s SPI pins (A6-A8) instead of A3-A5 for the Photon.
On the firmware libraries front, everything “just worked.” When I first started this project, I was manually including libraries for the TFT and Thermocouple, so my only real step here was adding references to the libraries in my project.properties file and removing the library source files from my project. Everything compiled on the first try, and I was off to add new features.
With the new features, I had a bit more work. The piezo is a simple analog sensor and was easy to add to my project. After a bit of trial and error, I was able to calibrate it to detect light movements for fermentation, and I even added Particle’s new sleep mode support so that my device can go offline during the 24-48 hours after cooking is done and wake up when the first sign of fermentation is detected.
const uint8_t KNOCK_PIN = A4;

int setBrewMode(String command)
{
  if (command == "brew" && !isBrewingMode)
  {
    // Start brewing
  }
  else if (command == "ferment")
  {
    isBrewingMode = false;
    isFermentationMode = true;
    fermentationModeStartTime = millis();

    clearScreen();
    tft.setCursor(0, 140);
    printSubheadingLine("Waiting for");
    printSubheadingLine("Fermentation...");

    System.sleep(KNOCK_PIN, CHANGE);

    return 1;
  }
  else if (command == "stop")
  {
    // Stop
  }

  return 0;
}

void loop()
{
  if (isFermentationMode)
  {
    int16_t knockVal = analogRead(KNOCK_PIN) / 16;

    if (knockVal >= 6)
    {
      if (!isFermenting)
      {
        isFermenting = true;
        fermentationStartTime = millis();
        lastKnock = fermentationStartTime;

        clearScreen();
        tft.setCursor(0, 10);
        tft.setTextColor(ILI9341_YELLOW);
        tft.setTextSize(2);
        tft.print("Fermentation started");
        tft.setTextColor(ILI9341_WHITE);

        displayFermentationHeading();

        waitUntil(Particle.connected);
        Particle.publish("fermentation/state", "start");
      }
    }
  }
  else if (isBrewingMode)
  {
    // Brewing mode logic
}
Brew Buddy now with bitmap support
Adding bitmaps to the TFT was a bit more complicated, and included porting the Adafruit_ImageReader library into the Particle Ecosystem (which is public, so please use it!). With a new library in hand, however, it was just a few more lines of code to get a nice fancy image on the splash screen of my project.Adafruit_ILI9341 tft = Adafruit_ILI9341(TFT_CS, TFT_DC, TFT_RST);
Adafruit_ImageReader reader;
SdFat sd;
void setup()
{
tft.begin(TFT_SPEED);
if (!sd.begin(SD_CS))
{
sd.initErrorHalt();
}
printSplash();
}
void printSplash()
{
ImageReturnCode stat;
tft.setRotation(2);</code>
clearScreen();
stat = reader.drawBMP("brew.bmp", tft, sd, 0, 0);
delay(2000);
tft.setCursor(0, 40);
printHeadingTextLine("BrewBuddy");
printHeadingTextLine(APP_VERSION);
printSubheadingLine("Created by");
printSubheadingLine("Brandon Satrom");
delay(3000);
}
What’s next?
I’m pleased to say that, so far, this Photon to Argon port has been a success! With minimal changes to firmware, I was able to take an older project, refresh it, and start adding new functionality.And of course, a new working prototype means an excuse to spin a new board and add some cloud-based visualizations of my brews! Stay tuned for part two of this post, where I’ll share the rest of this project and the results of a test brew!
In the meantime, I’m streaming nearly every step of this project live on Twitch on Tuesdays and Thursdays. Be sure to follow me there, and click the links below for replays of the initial few streams:
See you in a few weeks!


