I2c sensors not sending data but showing up in i2c scanner and working on arduino

Hey IoT-ers!

I’m making a device using the particle e-series and a bunch of air sensors. I mistakenly wired the 3.3V i2c sensors to one i2c port (D0 & D1, wire) and the 5V sensors to the other i2c port (C4 & C5, wire1). I have been having troubles with these, but I’ve seen the other community discussions about this.

My main problem is that some of the sensors show up on the i2c scanner, but wont send data. For instance, we are using an SGP30 with a logic level shifter to get it from its 1.8V supply to the 3.3V i2c bus. When running an i2c scanner, I find the address and sensor, but not even the example codes will work. They output errors when trying to begin the connection.

Now here’s the weird part: I hooked up an arduino to the particle board’s VCC, GND, SCL, and SDA lines, while holding the RESET button on the particle board. (I hooked it up to either the 5V or 3.3V bus). When running the SAME CODE all of the sensors output good data.

I saw in one place that Adafruit libraries assume a singluar i2c port, which messes things up with the e-series board’s two i2c ports. This seems to be true, I think. Any sparkfun libraries we use work, but the sgp30’s adafruit libarary did not work.

So my question is, do I need to go in and change libraries to adapt them for the dual i2c ports on the e-series? Or possibly not use libraries at all? I am much more well-versed in hardware than firmware, so some resources on how to use i2c without libraries would be very appreciated.

Thanks!

what do you mean ? You connect arduino to e-series in parallel ? and your sensor are still connected to I2C ? then you hold reset on particle and get the correct data from arduino ?
Do you have any pull-up resistors or do you enabled them in code ?
could you share you code and show photo or draw schematic how all is connected ? will be much easier to T/S

what Arek said… and welcome to the community, Brian!

Thank you both for responding so quickly!
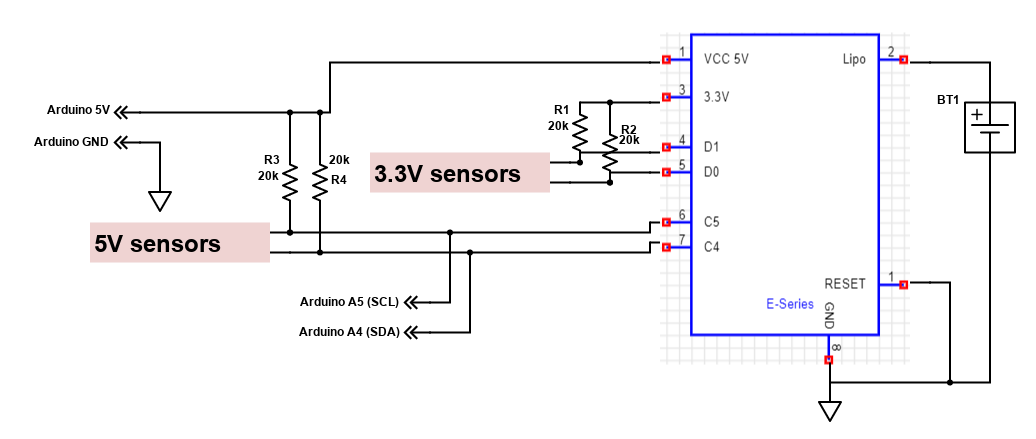
Well I connected the arduino as shown below:


The arduino’s A4/A5 can be connected just as easily to the 3.3V bus.

I’d run different code on the arduino depending on which sensor I was looking at, but for instance, the code for the sgp30 is

#include <Wire.h>
#include "Adafruit_SGP30.h"

Adafruit_SGP30 sgp;

/* return absolute humidity [mg/m^3] with approximation formula
* @param temperature [°C]
* @param humidity [%RH]
*/
uint32_t getAbsoluteHumidity(float temperature, float humidity) {
    // approximation formula from Sensirion SGP30 Driver Integration chapter 3.15
    const float absoluteHumidity = 216.7f * ((humidity / 100.0f) * 6.112f * exp((17.62f * temperature) / (243.12f + temperature)) / (273.15f + temperature)); // [g/m^3]
    const uint32_t absoluteHumidityScaled = static_cast<uint32_t>(1000.0f * absoluteHumidity); // [mg/m^3]
    return absoluteHumidityScaled;
}

void setup() {
  Serial.begin(115200);
  while (!Serial) { delay(10); } // Wait for serial console to open!

  Serial.println("SGP30 test");

  if (! sgp.begin()){
    Serial.println("Sensor not found :(");
    while (1);
  }
  Serial.print("Found SGP30 serial #");
  Serial.print(sgp.serialnumber[0], HEX);
  Serial.print(sgp.serialnumber[1], HEX);
  Serial.println(sgp.serialnumber[2], HEX);

  // If you have a baseline measurement from before you can assign it to start, to 'self-calibrate'
  //sgp.setIAQBaseline(0x8E68, 0x8F41);  // Will vary for each sensor!
}

int counter = 0;
void loop() {
  // If you have a temperature / humidity sensor, you can set the absolute humidity to enable the humditiy compensation for the air quality signals
  //float temperature = 22.1; // [°C]
  //float humidity = 45.2; // [%RH]
  //sgp.setHumidity(getAbsoluteHumidity(temperature, humidity));

  if (! sgp.IAQmeasure()) {
    Serial.println("Measurement failed");
    return;
  }
  Serial.print("TVOC "); Serial.print(sgp.TVOC); Serial.print(" ppb\t");
  Serial.print("eCO2 "); Serial.print(sgp.eCO2); Serial.println(" ppm");

  if (! sgp.IAQmeasureRaw()) {
    Serial.println("Raw Measurement failed");
    return;
  }
  Serial.print("Raw H2 "); Serial.print(sgp.rawH2); Serial.print(" \t");
  Serial.print("Raw Ethanol "); Serial.print(sgp.rawEthanol); Serial.println("");
 
  delay(1000);

  counter++;
  if (counter == 30) {
    counter = 0;

    uint16_t TVOC_base, eCO2_base;
    if (! sgp.getIAQBaseline(&eCO2_base, &TVOC_base)) {
      Serial.println("Failed to get baseline readings");
      return;
    }
    Serial.print("****Baseline values: eCO2: 0x"); Serial.print(eCO2_base, HEX);
    Serial.print(" & TVOC: 0x"); Serial.println(TVOC_base, HEX);
  }
}

Which works when using the arduino, but the same code on the e-series fails at the sgp.begin() function, returning an error of “Sensor not found :(”. Even when adding a separate Wire.begin() function call in the setup.

What is also strange is that on the e-series i2c scanner, the sgp30 shows up. That i2c scanner code is shown below:

#include "Particle.h"

int led = D7;

int motor = B0;

void setup()
{
    
    pinMode(motor,OUTPUT);
    Particle.function("MOTOR_DUTY",mDuty);
    
    
    pinMode(led,OUTPUT);
    digitalWrite(led,HIGH);
    delay(500);
    digitalWrite(led,LOW);
    delay(500);
    digitalWrite(led,HIGH);
    Particle.function("ILed",I2CT);
    Serial.begin(9600);
    
//    while ( digitalRead(led) ) {
//        Serial.println("Waiting for keypress ...");
//        // it waits until you run the ILed function on the console
//        delay(1000);
//    }
    
	Wire.begin();

	Serial.begin(9600);
	delay(1000);
	Serial.println("I2C Scanner\n");
	Particle.publish("I2C Scanner");
}


char message[100];
char add[10];

void loop()
{
	byte error, address;
	int nDevices;

	Serial.println("Scanning...");
	Particle.publish("Scanning...");

	nDevices = 0;
	for(address = 1; address < 127; address++ )
	{
		// The i2c_scanner uses the return value of
		// the Write.endTransmisstion to see if
		// a device did acknowledge to the address.
		Wire.beginTransmission(address);
		error = Wire.endTransmission();

		if (error == 0)
		{
			Serial.print("I2C device found at address 0x");
			if (address<16)
				Serial.print("0");
			Serial.print(address,HEX);
			Serial.println("  !");
			
			sprintf(message,"I2C device found at address 0x%x",address);
			sprintf(add,"0x%x",address);
			Particle.publish(message,add);

			nDevices++;
		}
		else if (error==4)
		{
			Serial.print("Unknown error at address 0x");
			if (address<16)
				Serial.print("0");
			Serial.println(address,HEX);
			
			sprintf(message,"Unknown error at address 0x%x",address);
			sprintf(add,"0x%x",address);
			Particle.publish(message,add);
		}
	}
	if (nDevices == 0) {
		Serial.println("No I2C devices found\n");
		Particle.publish("No I2C devices found");
	}
	else {
		Serial.println("done\n");
		Particle.publish("done");
	}

	delay(5000);           // wait 5 seconds for next scan
}


int I2CT(String command) {
    digitalWrite(led, digitalRead(led)^1 );
    return digitalRead(led);
}


int mDuty(String command) {
    float duty = (float)atoi(command);
    duty = duty * 255.0/100.0;
    analogWrite(motor,duty);
    return duty;
}

Running this code on the particle outputs the sgp30’s i2c address. But I cant begin communication after that.

Thanks again for your help!

Hi Brian,

I never used an sgp30, but I ran a search and found this thread that may be of interest, would you like to check it out?

If it does not help, here's the search:
https://community.particle.io/search?q=sgp30

If still in trouble, do not hesitate to keep asking,
Gustavo.

1 Like

I assuming that you use this one.

As you can see in the pinout description:
SCL - I2C clock pin, connect to your microcontrollers I2C clock line. Can use 3V or 5V logic, and has a 10K pullup to Vin
SDA - I2C data pin, connect to your microcontrollers I2C data line. Can use 3V or 5V logic, and has a 10K pullup to Vin.
But you are using sgp30 with logic level shifter to power this sensor on 1.8V (which is 50mA output) this is bad idea I will recommended to use Vin instead as right now your SDA/SCL lines are floating, didn’t have any pull-ups. From my prerespective the 20k resistors for 5V sensor are to weak and IMHO why this working with ardurinio (I assuming is uno) because your 20k resistors with uno 10k resistors make almost perfect pull-ups (around 6.7k)So Try to power sgp30 to Vin (5v or 3V ) and maybe will be worth to change your 20k to 10k if needed.
Here is nice calc to get parallel connected resistors value :wink: Parallel Resistance Calculator - Electrical Engineering & Electronics Tools
Perfect pullups will be 4.7k
EDIT:
also if you are using web IDE include ADAFRUIT_SGP30.h in your code and try to run the example which is there

Wow, thank you both for the help!
@gusgonnet I found this from the search: Photon: SGP30 Sensor not found, which seems very like the problem I’m encountering. I had a couple of questions about that though. In that, OP said he used “the I2C debug”. How can I use that?
Also, someone seemed to solve it with: Photon: SGP30 Sensor not found - #3 by ScruffR. I am just not sure what he is talking about to be honest. How would I send the 0x0020? Do I need to go in and change the library myself? My C++ is fairly rusty.

@dreamER I am actually not using a breakout board at all. I made a PCB with the voltage regulator and i2c level shifter, to bring the 1.8V SCL and SDA lines up to the 3.3V bus. Also, I have tried soldering in different resistors in parallel with the 20k pullups I already have on the board. Everything from a 1k to a 50k in parallel, and none of them improved the functionality. I do have 4.7k pull ups from the 1.8V i2c lines though, as shown below. I’m not sure what else to try with regards to the pull-ups.
sgp30

Thanks again! Super duper helpful

You have R42 and R46 just on Low side (on Source of your n-mosfet’s) but should be on both side. Try to connect on High side as well (to Drain and 3.3V ) as shown below

Then grab the lib which I mentioned in previous post flash the example and see if it’s working. If not we gonna digging more :wink: unfortunately I don’t have any of SGP30 to test :disappointed:

1 Like

I think the fix should be already in your lib, please check that the version is 1.0.4 or above.
Here's the code fixed:

if on your lib, file name Adafruit_SGP30.cpp contains what is on the right (or similar) around line 75 you are good to go. If it's the same or similar to the left, we need to check the version or ask Scruffr.

Let me know
Gustavo.

1 Like

@dreamER Sorry for not making it clearer, but I have the 20k pull ups on the 3.3V bus, the high side of the 1.8V-3.3V level shifter. And I’ve tried the adafruit_sgp30.h library, and the example code is what fails to connect, outputting an error at the sgp.begin().

@gusgonnet I think thats it! It seems like I’m using the 1.0.0 library. Which has:

  if (featureset != SGP30_FEATURESET)
    return false;

When i search for other sgp30 libraries, only this adafruit one and a libarary from sensiron show up, not the adafruit 1.0.4. The sensiron library has the same code as above.

Also when I try to edit the library, it wont let me. I’m not sure where to go from here, do I need to make a new library with the changes myself?

Thanks again,
Brian

@Bdehority, 20K pull-ups may be too large. You could try 4.7K pull-ups. I had issues with an Aliexpress sgp30 with an Argon and ended up using a Photon along with the Sensiron library. There may be an I2C issue on the Argon that may have been fixed by now.

1 Like

In Web IDE you can add your own files as shown here
https://docs.particle.io/tutorials/developer-tools/build/#adding-files-to-your-app

In your case you'd add a set of Adafruit_SGP30 files and then copy/past the code of the library's .h and .cpp file to the respective tabs and modify them as needed.
Don't forget to remove the original library reference from your project.

The whole process is a lot easier with Particle Workbench.

2 Likes

So I made one for you,it's here:Particle Web IDE
As this can be so tricky in the web IDE as @ScruffR said:

But for exercising you can go here:https://github.com/dyadica/Adafruit_SGP30/tree/master/src
then follow the steps which @ScruffR pointed above then click on .cpp then click raw (on the right corner ) ctrl+a, ctrl+c back to web IDE and ctrl+v repeed this for .h file and .ino file.
Please note that I didn't tested it it's compile fine over Photon V2.0.0 but I don't have any e-series dev.
Also consider what @peekay123 said:

Hope will help :+1:

2 Likes

Thank you everyone!
Apologies for the delay, I was trying to figure out the particle workbench, but it is taking some time.
But the new library/script from @dreamER worked! to an extent :confused:

So now, the board can read the sensor’s data, but it only outputs TVOC=0 ppb, and eCO2=400 ppm.
I saw another post: SGP30 doesn't work on Gen3 devices - #25 by irwige that outlined a possible way to fix this. It seems like its only possible by using the particle workbench, is that correct? I’ve been trying to do this in just the IDE but it doesn’t seem possible.

In addition, I read at: Arduino Test | Adafruit SGP30 TVOC/eCO2 Gas Sensor | Adafruit Learning System that it could require 12 hours of measurements to set up the baseline. So I ran it all of last night, but the outputs didnt change.

So I guess I have two questions:

  1. would it be possible to implement that fix outside of the particle workbench? It wouldn’t be the end of the world, but dealing with visual studio code is a hassle.
  2. would it be possible to just set some baseline values in EEPROM and use those?

Thanks again to everyone, just incredibly helpful all around.
-Brian

Hi,

no you don't need workbench at all.
if you just click:

cpy_t_app

and save, you will be able to edit everything .ino, .cpp and .h files but IMHO you don't need to do this as well because Wire.h is already included via Particle.h

If your serial didn't throw any of "Measurement failed" or "Failed to get baseline readings" we can't blame pull-ups any more as looks like is communicating fine . So to be honest I don't have any idea what else can be.
Maybe the sensor itself is defective ?

I included the Wire.h just in case but i'm positive that you don't need it.
it's here: Particle Web IDE

This topic was automatically closed 60 days after the last reply. New replies are no longer allowed.