i’ve created a project which allows you to connect your Photon to Apple HomeKit. Lightbulb HAP example included, but you can easily change to any other working. Project is more “Proof of concept” rather than complete library.
Currently i am working on it, so more to come. Any contribution is more than welcomed.
Pair setup/verify crypto is based on customized WolfSSL.
There’s no HAP-JS server needed. All the necessary crypto is computed right in the Photon.
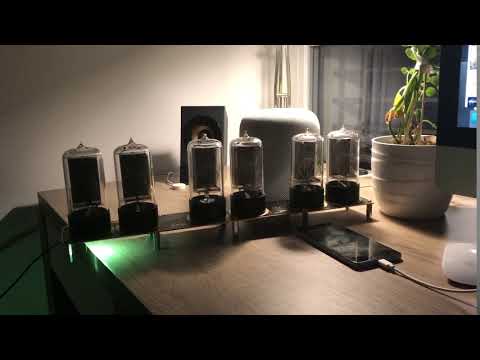
My goal is to connect Dalibor Farny’s Nixie clock to HomeKit -> https://www.daliborfarny.com
NIxies are controlled by Photon.
Hi Lukas, thanks for your sharing of this nice project!
It’s been years that I’m watching this forum, hoping to find someone who wants to try tomake Particle devices compatible with Homekit. (Not that the forum lacks interesting subjects or people!)
I have a complete home automation system under development with now around 10 Photons in the house. I use Homekit (Siri) through Homebridge currently. That works fine, but I need to have a RPi3 B+ running also…
I also tried the OpenHAB implementation of Homekit, but I still prefer Homebridge.
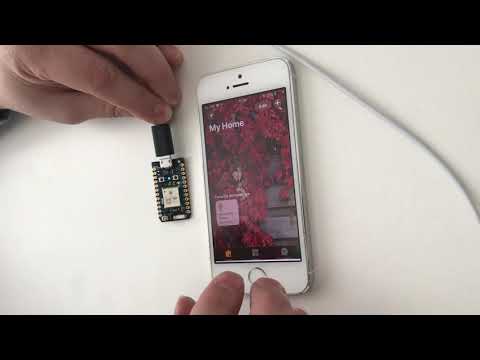
When I saw this post, I couldn’t wait and just now I’ve downloaded your project from GitHub, installed it and flashed it to a “loose” Photon powered via USB.
I checked in the Particle console and saw no activity.
I tried to find another accessory with my iPhone and found nothing…
Any tips how to pair and how to set-up commands on the Photon which can be executed by Homekit/Siri?
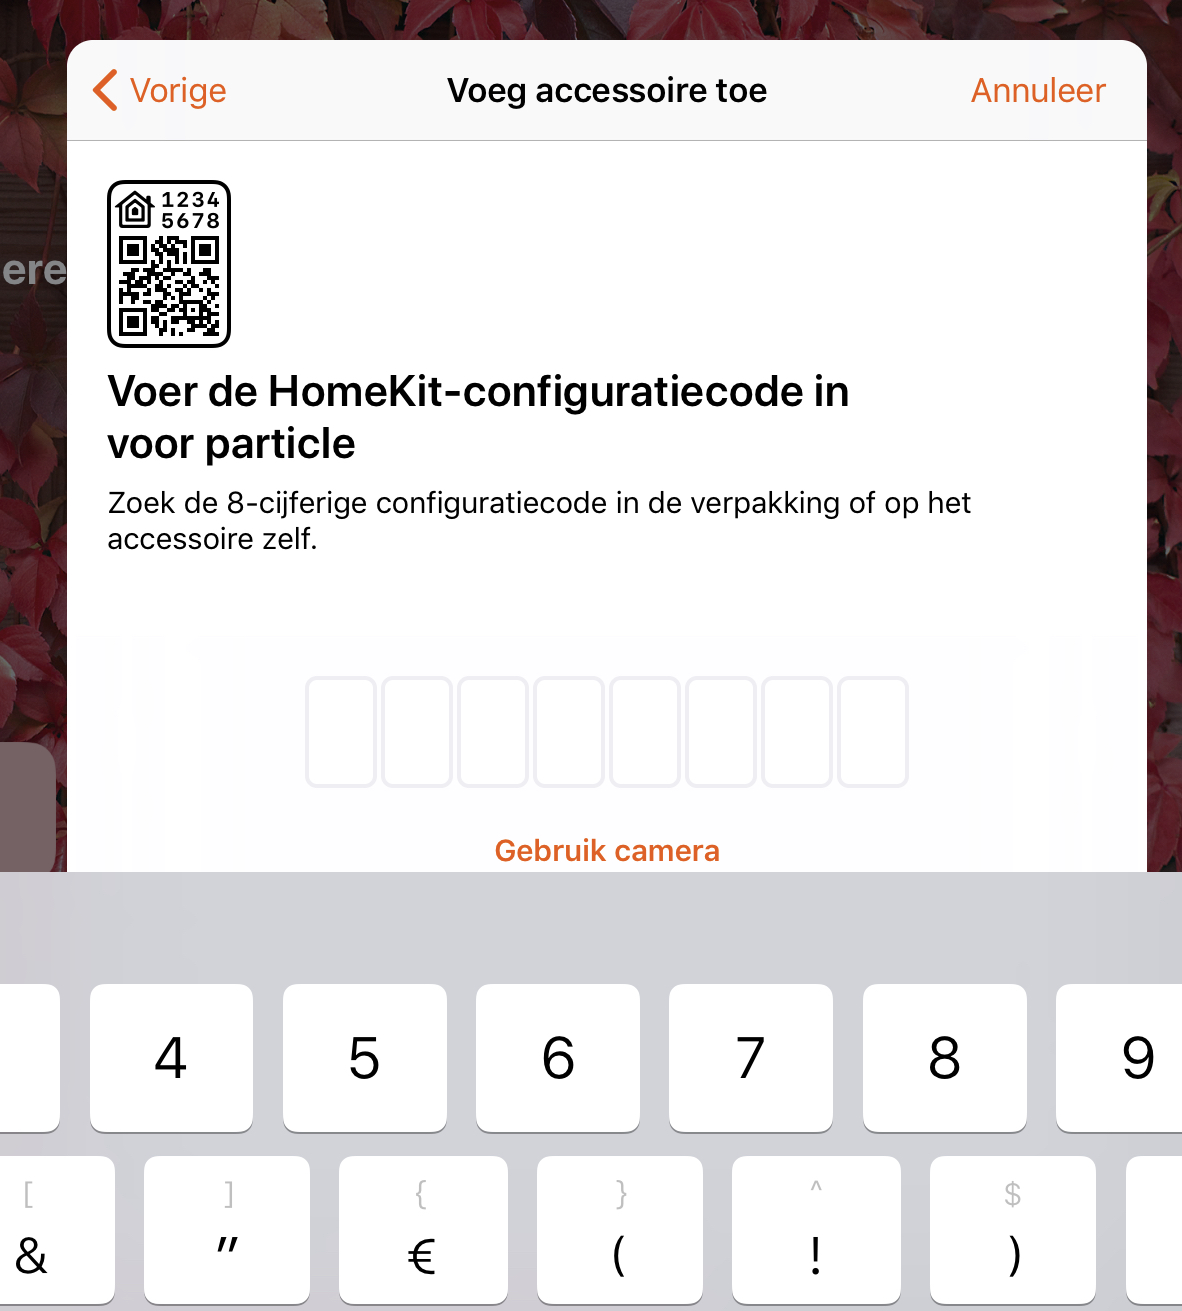
Hmm, it is strange. I am still debugging it, but try few restarts, since Bonjur advertistment is not working 100% sure yet. I would recommend you to download Discovery Bonjour You have to see “_hap.tcp” devices there advertised first. When you see it you can pair via Home App (Hit the “I cannot scan the code” and enter code manually).
In Bonjour Discovery app you should see this device first:
As i said try first few restarts till you see the device advertised. I am still working on it.
Also i am writing to Console a lot, at least you should see “Hello World!”. Also try to uncomment:
//while(!Serial.isConnected()) Particle.process();
So the app will wait till console will be connected.
I did: It's a nice and useful tool, but I had no luck yet to find "_hap.tcp." like you showed above...
Also I tried resetting the Particle many times, no change...
However, when I wake-up our iPad, I can see this "_homekit.tcp." appearing...
I know the iPad gets a role of homekit hub or so. (?)
I tried to pair my HAP Photon on our iPad instead of on my (old) iPhone and this is what happened:
Any idea what could be the reason for this failed pairing?
Probably I should configure some more but I don’t know where to start…
(PS: I did not edit any of your files yet…)
I’ve checked the video - your progress seems correct. Could you please attach the Console log, during the pairng?
Also i would recommend every time you fail with connection (pairing) to change the deviceIdentifier (in HKConfig.h), to any random, but valid MAC address. Also you can change the deviceName to particl1,particle2 etc. but keep in mind to keep deviceName exactly 8 characters long (different name not fully supported yet.
I am currently working on accessory characteristics (i.e lightbulb power state) notification, so bonjour will be done later.
OK, it seems i am stuck. I am not able to find the problem.
You can Pair, Verify, Connect to Photon as HomeKit Accessory. You can several time try to turn off/on the led, but after about a minute, TCPClient wont receive any bytes so nothing is processed.
Seems something with keep alive with tcp or i dont know. I spent 6h+ with find a problem, but didn’t succeeded.
Any help would be appreciated.
It seems i’ve found a bug in Bonjour implementation and project is now almost stable.
Next step is some refactorings and create a library.
Any testing will be welcomed.
try again new version, i am currently working on it almost every afternoon. There are some new commits. Of course i would recommend a new pairing.
Also can you please describe more briefly the calling “cloud functions”. Bcs i am not planning it, there’re now reason. Since Homekit work over local wifi and you can control Photon directly.
In my example i’ve provided a series of callback functions, which you can handle directly on device.
I see, i will comment my example on GitHub, where to put a call to Particle function. Pass me a snippet, how to call desired function, and i will put it in example.
If you want to know what I mean, here is an example of a sketch with a "Particle.function" and a "Particle.variable": It can be found among the standard examples of Particle's Web IDE:
// -----------------------------------------
// Function and Variable with Photoresistors
// -----------------------------------------
// In this example, we're going to register a Particle.variable() with the cloud so that we can read brightness levels from the photoresistor.
// We'll also register a Particle.function so that we can turn the LED on and off remotely.

// We're going to start by declaring which pins everything is plugged into.

int led = D0; // This is where your LED is plugged in. The other side goes to a resistor connected to GND.

int photoresistor = A0; // This is where your photoresistor is plugged in. The other side goes to the "power" pin (below).

int power = A5; // This is the other end of your photoresistor. The other side is plugged into the "photoresistor" pin (above).
// The reason we have plugged one side into an analog pin instead of to "power" is because we want a very steady voltage to be sent to the photoresistor.
// That way, when we read the value from the other side of the photoresistor, we can accurately calculate a voltage drop.

int analogvalue; // Here we are declaring the integer variable analogvalue, which we will use later to store the value of the photoresistor.


// Next we go into the setup function.

void setup() {

    // First, declare all of our pins. This lets our device know which ones will be used for outputting voltage, and which ones will read incoming voltage.
    pinMode(led,OUTPUT); // Our LED pin is output (lighting up the LED)
    pinMode(photoresistor,INPUT);  // Our photoresistor pin is input (reading the photoresistor)
    pinMode(power,OUTPUT); // The pin powering the photoresistor is output (sending out consistent power)

    // Next, write the power of the photoresistor to be the maximum possible, so that we can use this for power.
    digitalWrite(power,HIGH);

    // We are going to declare a Particle.variable() here so that we can access the value of the photoresistor from the cloud.
    Particle.variable("analogvalue", &analogvalue, INT);
    // This is saying that when we ask the cloud for "analogvalue", this will reference the variable analogvalue in this app, which is an integer variable.

    // We are also going to declare a Particle.function so that we can turn the LED on and off from the cloud.
    Particle.function("led",ledToggle);
    // This is saying that when we ask the cloud for the function "led", it will employ the function ledToggle() from this app.

}


// Next is the loop function...

void loop() {

    // check to see what the value of the photoresistor is and store it in the int variable analogvalue
    analogvalue = analogRead(photoresistor);

}


// Finally, we will write out our ledToggle function, which is referenced by the Particle.function() called "led"

int ledToggle(String command) {

    if (command=="on") {
        digitalWrite(led,HIGH);
        return 1;
    }
    else if (command=="off") {
        digitalWrite(led,LOW);
        return 0;
    }
    else {
        return -1;
    }

}
It would be great if we could see the value of the variable "analogvalue " in the Homekit screen and be able to call the function "ledToggle(String command)" with String command = "on" and "off".
I will try your latest version later tonight...
OK, I just downloaded and installed your latest version and WOW: It is much more stable and reliable!
Pairing was easy and quick.
Reactiveness:
When I switch off the photon, it is not reacting anymore in Homekit, of course.
But when I reconnect the Photon to usb power again, it immediately reconnects and reacts as before.
It even works on an old iPhone 5, which it didn't always do before!
Well done Lukas!
PS: If you want to know more about this“Particle.function” and “Particle.variable”, here is the link to the Particle documentation: LINK