Originally published at: Here’s how to integrate your Particle-powered projects with Azure IoT Central – Particle Blog
In this post, I’ll introduce Azure IoT Central, and show you how to leverage IoT Central with your Particle projects to capture telemetry and create simple visualizations of your sensor data. And the best part is that this method allows you to keep on using Particle.publish to push data to the Device Cloud; no firmware changes needed!
When I give presentations or talk to groups, a common theme that I like to underscore is that, in IoT apps, the hardware is never the end of the effort. Nearly every time, the reason you build a connected solution is because you want to utilize connectivity for remote monitoring or remote control of devices. While remote control is typically the domain of mobile apps, remote monitoring is often done in concert with web apps or cloud-based services.
Most of the time, the goal of remote monitoring is to take raw data from sensors and provide insights through visualizations and alerts. And while the flexibility and power of Particle is such that you can easily build bespoke monitoring solutions with the help of the Device Cloud API and any number of modern web technologies, sometimes you’re just looking for a turnkey solution that doesn’t require writing much code. In this post I’ll show you how to leverage one such solution.
Azure IoT Central basics
Azure IoT Central is a hosted, web-based solution for managing IoT devices. A recent entrant to the Azure family of products, IoT Central provides developers with a low-code method for managing and monitoring devices. It features a visual interface for configuring device data (or telemetry), configuring triggers, events, rules, and building simple dashboards for monitoring device state and information.
Ultimately, this differs from Azure IoT Hub in the same way that a faucet differs from plumbing. IoT Hub is a pipe through which you push your device data into Azure. It facilitates secure connectivity between the cloud and your devices, but does not provide monitoring or control of those devices. IoT Central, on the other hand, is a SaaS application that allows you to build monitoring and management solutions for your connected devices. It leverages IoT Hub under the covers, and provides a number of features on top.
It’s important to note that while IoT Central uses IoT Hub, the current Azure IoT Hub integration Particle provides does not support Azure IoT Central at this time. This is largely because IoT Central apps require different secrets and connection details than you would use for ingesting data into IoT Hub. But all is not lost! Through the help of a device bridge application from the Azure team, you can continue to leverage the Particle Device Cloud for simple data publishing, while harnessing IoT Central for data visualization.
Getting started with Azure and IoT Central
Before setting up a Particle and Azure IoT Central integration, you’ll need an Azure account and a deployed IoT Central application. You can create a free Azure account here. Once you’ve done that, create an IoT Central app using the instructions here. With an IoT Central app configured, you’re ready for the next step.
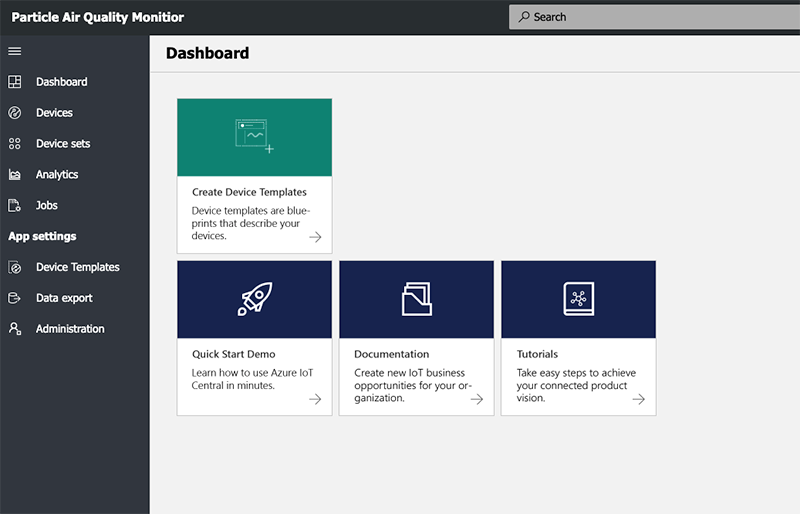 After you create your IoT Central application, you’ll be taken to the dashboard screen.
Creating a device template in Azure IoT Central
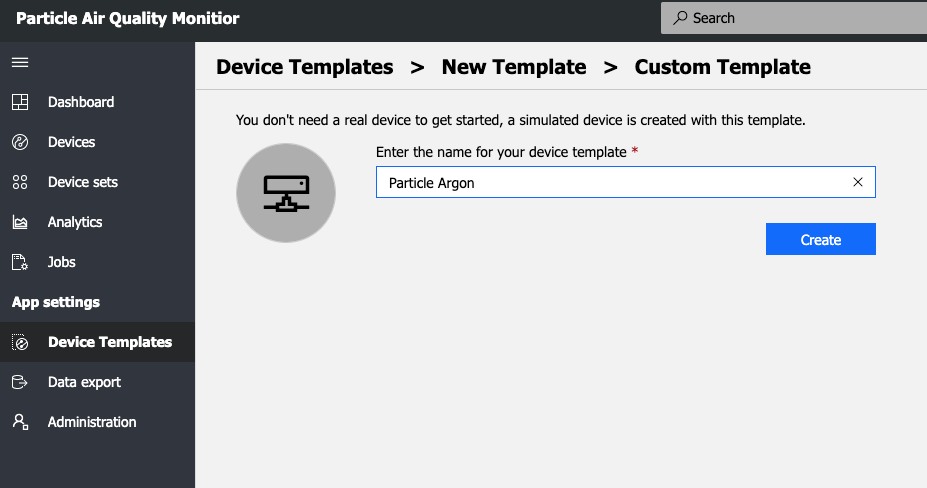
You’ll next need to create a device template, IoT Central’s way of helping you create pre-defined telemetry, events, and dashboards that will be consistent for a type of device.
Create a template that includes telemetry mappings for the fields you plan to send from your Particle device through the Device Cloud and into IoT Central. For example, for this post, I am using a simple Air Quality monitoring device that reads temperature, pressure, humidity, and a qualitative air quality value every 30 seconds, and publishes that info to the Particle Device Cloud. For those four values, I added four pieces of telemetry in IoT Central.
In your IoT Central Application, navigate to the Device Templates screen and click the New button on the top right. Choose the “Custom” card, give your template a name and click create.
Once you’ve created your template, add telemetry to match the data you’re publishing from firmware. For my project, I added three fields for the temp, humidity, and pressure values, and a state measurement for the air-quality measurement. Be sure to use the exact name for each value from your payload in the “Field Name” input.


Once you’ve added a template and telemetry, you’re ready to move onto middleware.
Using the Azure IoT Central device bridge
To integrate Particle devices with IoT Central, you’ll need to set-up two things:
- A middleware service to catch webhooks from Particle and forward data into IoT Central.
- A Webhook integration to forward Particle events to your middleware.
The middleware solution can be anything you like, and you can roll it yourself, but if, like me, you don’t enjoy spinning up sites from scratch just for fun, the Azure team provides an Azure IoT Central Device Bridge template solution with one-click deployment into your Azure account.

Navigate to the README for the project and click on the Deploy to Azure button. This opens up an Azure Marketplace template that’s preconfigured to add 4 resources to your Azure account: An Azure App Service and App Service plan for hosting the middleware app, a Key vault to hold your IoT Central tokens, and a Storage account.
To complete the deployment from the template, select a subscription, resource group, and location. Then, provide the Scope ID and SAS Key for your Central application. These can be obtained from the Administration > Device Connection screen of your IoT Central application.

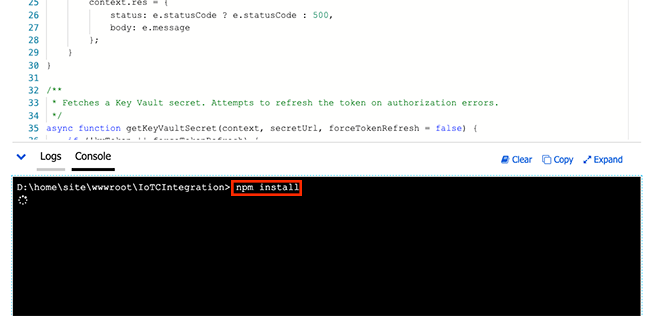
Once the deployment is done, you’ll have an App Service that can securely forward messages to your IoT Central instance. The App Service deployed by this template is a Node.js app, so the next step is to open your function app in the portal, run npm install to install dependencies and restart the app.
Once the app restarts, grab the function URL to set-up the webhook on the Particle side. For additional info on this or the last few steps, check out the README for the device bridge project.

Setting Up a Particle Integration with Azure IoT Central
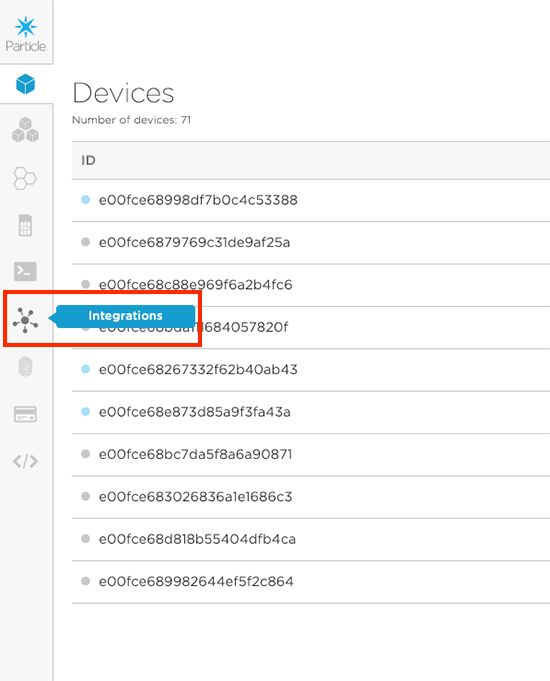
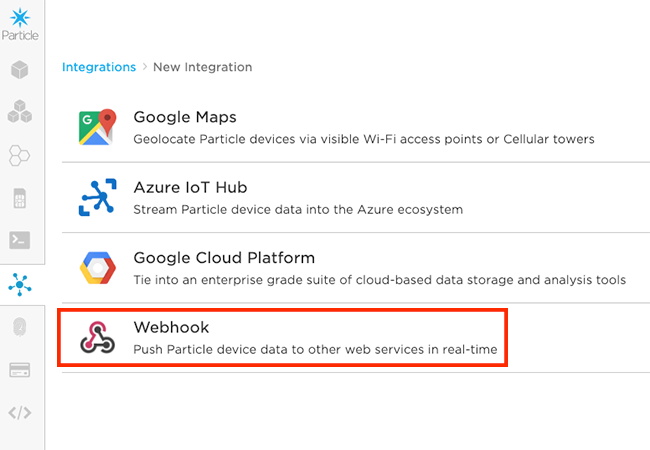
With the App Service function URL in hand, you’re ready to create the integration on the Particle side. First, head to the Particle Console and click on the integrations icon on the left gutter navigation.
Click the New Integration card, and then click the Webhook option. Be sure not to select the Azure IoT Hub integration.
In the Webhook builder, enter the name of the event you want to listen for on the particle side. Then, paste in the URL from the Azure App Service function you created in the last step. Leave the request type unchanged and select JSON for the request format. In the last drop-down, select the Particle device you plan to publish events from.
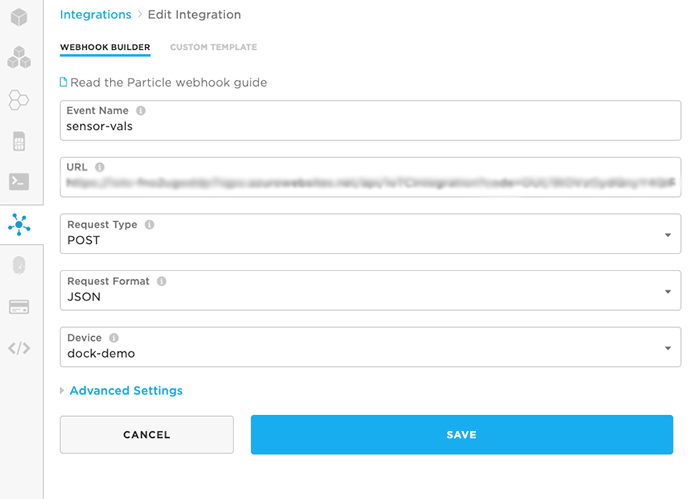
In order to get the request payload into a format that your App Service middleware can ingest and forward to IoT Central, you’ll need to customize the default webhook that Particle sends. So, before clicking Create Webhook, click the Advanced Settings link to reveal the request form fields. Click the Custom option button. Copy the snippet below and paste it into the textarea. You may get a bad string warning from the built-in validator, but you can ignore this message.
{
  "device": {
    "deviceId": "{{{PARTICLE_DEVICE_ID}}}"
  },
  "measurements": {{{PARTICLE_EVENT_VALUE}}}
}
After you’ve changed the payload, click Create Webhook. Now you’re ready to start publishing events through the Particle Device Cloud.
Publishing Events from Firmware
To publish events that your new integration will pick up and forward to IoT Central, you need only call Particle.publish from your firmware using the event name you specified when setting up the Webhook integration.
The beauty of this middleware approach is that you can use Particle’s powerful publish APIas you would for any other application and your firmware doesn’t need to have any knowledge of, or maintain a connection to, Azure IoT Central. In true pub/sub style, you fire it and forget it.
Pro tip: Brush up on your understanding of publish and subscribe with this Particle pub/sub tutorial.
For my example, I’m capturing temp, humidity, pressure and qualitative air quality readings every 30 seconds. Then, I use the JsonParserGeneratorRK library to create a JSON object to send along as the event data.
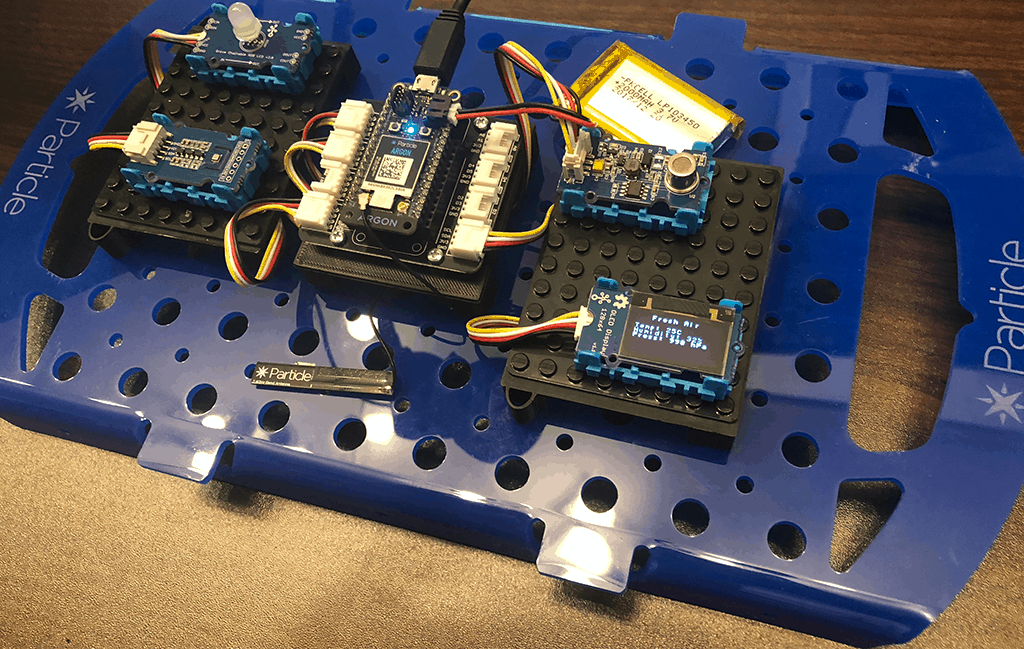 My home-grown Air Quality Monitoring solution
void createEventPayload(int temp, int humidity, int pressure, String airQuality)
{
  JsonWriterStatic<256> jw;
  {
    JsonWriterAutoObject obj(&jw);
jw.insertKeyValue("temp", temp);
jw.insertKeyValue("humidity", humidity);
jw.insertKeyValue("pressure", pressure);
jw.insertKeyValue("air-quality", airQuality);

}
Particle.publish("sensor-vals", jw.getBuffer(), PRIVATE);

}
Once you’ve added the publish logic to your firmware and flashed a device, head back to your IoT Central application and associate the device to the template you created. In the Devices window, you’ll see your template, and a link for Unassociated devices. Click that link, and if you see a device in the list with a name that matches the device id of your Particle device, you’ve configured everything successfully! Click the checkbox next to the device, then click the Associate menu item on the top right. Select your template and click Associate.

If, on the other hand, your device is not showing up, double-check the previous configuration steps to make sure everything is correct, including the App service function URL, and that the App service is running. You can also view the response header logs for your Webhook integration in the Particle console for additional insight.
Bringing it all together
Once your device is associated, navigate back to the Devices window to see your device in the list. If you click on it, you’ll be taken to the telemetry view, where you can see real-time data as it streams from your device, securely through the Particle Device Cloud, and into Azure IoT Central.
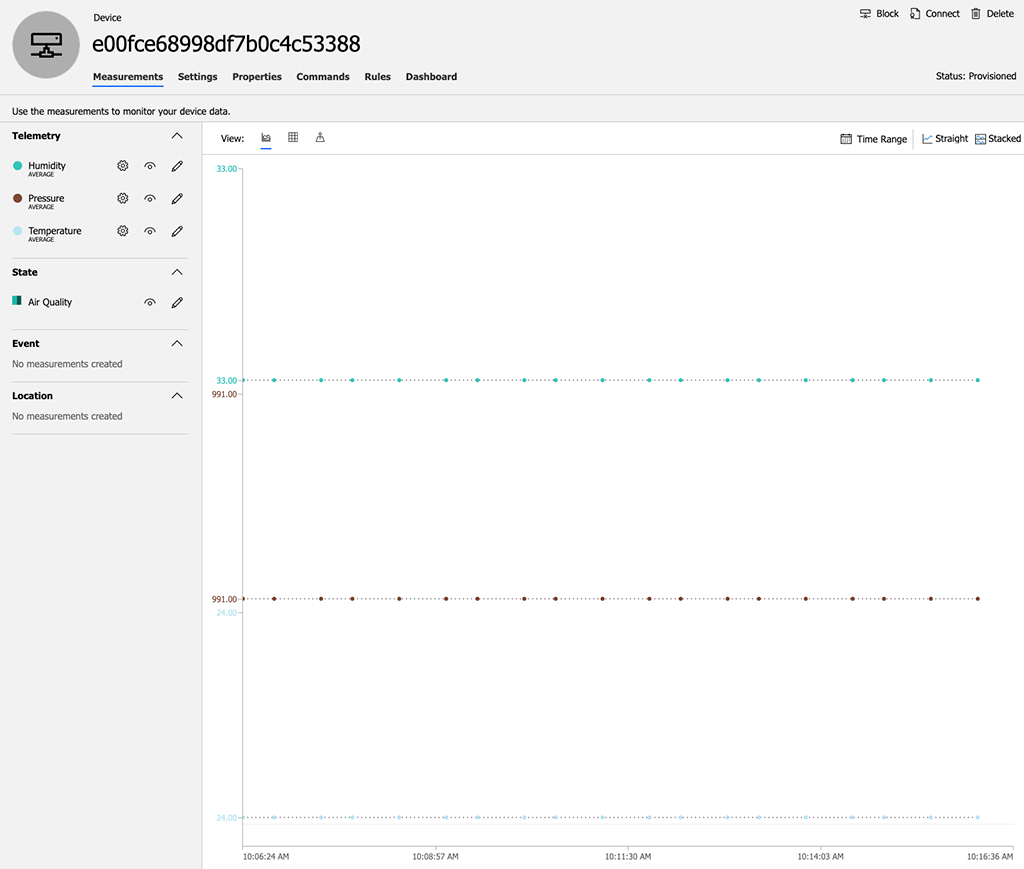
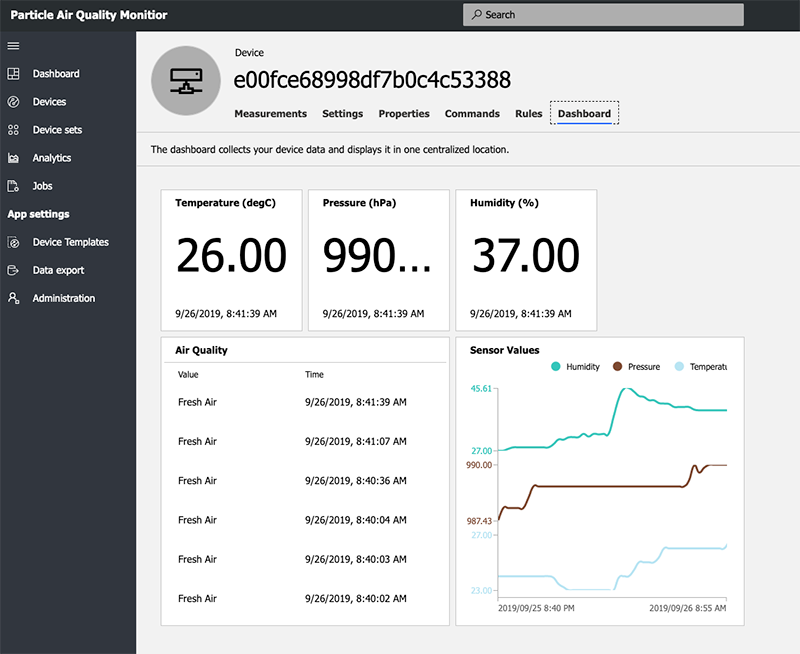
Once you’re streaming data in, you can create rules, alerts, and dashboards for device data. I’ll leave the exploration of how to do this up to you, but here’s an example, where I created a few last known value cards, a state history table and small line chart of readings over the last 12 hours.
Now that you’ve seen how easy it can be to tie your Particle-powered projects into Azure IoT Central, you should be building cloud-powered dashboards and experiences in no timer. The community is here to help, so if you have questions, or your own example to share, feel free to add those in the comments below!
