Ah good point, I forgot about the dashboard. When testing things for essentially days on end that might be easier. Plus particle dev serial monitor puts crazy wear on my processor.
Ok, got particle publish working.
I’ve checked out atomiot for data logging, but I’m not sure its what I want yet. What are some other data loggers that work well with Particle?
Have you tried this yet?
http://community.particle.io/search?q=data%20log
Yeah, I did actually, I found a few ideas, but I was more interested in the services that people have successfully connected. Right now I’m looking at initialstate.com.
So I was able to get the google docs working for data logging, its perfect for me needs. Right now I have two variables, relayON and relayOFF. I can get the variables to log to the spreadsheet individually, but not both onto one spreadsheet. My goals is for the spreadsheet to show the log of when the relay is turned on and off via the programming.
- Here is the script I’m putting into google for relayON.
function collectData() {
  var  sheet = SpreadsheetApp.getActiveSheet();

  var response = UrlFetchApp.fetch("https://api.particle.io/v1/devices/350024000947343432313031/relayON?access_token=2d94a80909ac813efb79b1803df15exxxxxxxxxx");

  try {
    var response = JSON.parse(response.getContentText()); // parse the JSON the Core API created
    var result = unescape(response.result); // you'll need to unescape before your parse as JSON
    var d = new Date(); // time stamps
    sheet.appendRow([d, "relayON", result]);
    } catch(e)
    {
      Logger.log("Unable to parse");
    }
  }
- Here is the script I’m using for relayOFF.
function collectData() {
  var  sheet = SpreadsheetApp.getActiveSheet();

  var response = UrlFetchApp.fetch("https://api.particle.io/v1/devices/350024000947343432313031/relayOFF?access_token=2d94a80909ac813efb79b1803df15exxxxxxxxxx");

  try {
    var response = JSON.parse(response.getContentText()); // parse the JSON the Core API created
    var result = unescape(response.result); // you'll need to unescape before your parse as JSON
    var d = new Date(); // time stamps
    sheet.appendRow([d, "relayOFF", result]);
    } catch(e)
    {
      Logger.log("Unable to parse");
    }
  }
1 Like
Now you have to poll the device for states, whereas you’d be able to use IFTTT very easily to push changes to the sheet, in one sheet. Give it a shot and see if that works for you?
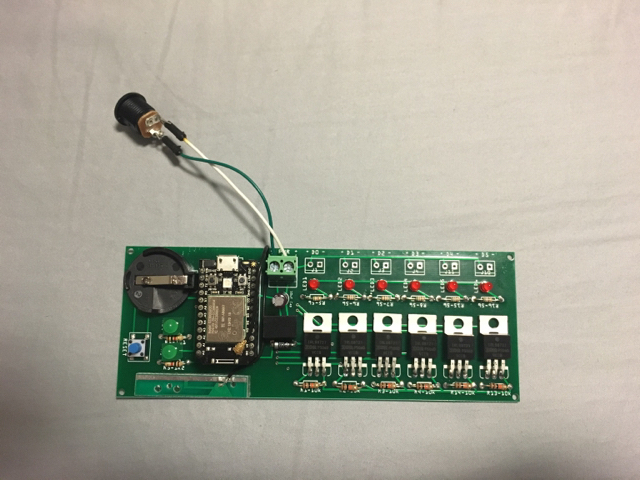
Well I’ve made some progress on the hardware for this project, I put together a 6 channel mosfet shield. I’m sending out the board today to have someone run some tests on it for me since I don’t have the equipment to do it here. If anyone has any suggestions please let me know. The unit is powered by a single 12v source, which also supplies voltage to each output. This unit is designed to run one pump at a time, even though the highest quality pumps I’ve tested only draw 150mA.
I went with a Traco TSR 1-2450 DC/DC buck converter for the 12v -> 5v conversion, and for the mosfets I’m using IRLB8721PBF.
If anyone has any further suggestions please let me know. I’ve tested the unit with a pump, ran it for multiple hours and tested on/off with a set program and it worked well. The mosfet’s didn’t even get warm.
Does anyone have any suggestions for enclosures? I need to figure out sizing yet, but in the mean time I’m looking for suggestions. Clearly I’ve scoured the internet and have a few ideas up my sleeve, but I figure it never hurts to ask.
Here’s a photo (don’t mind the old spark core)
3 Likes
Regarding internet connections, I did a test today to see if programs run when internet connection is lost, and it does. However, once I replugged the router in, I noticed that the photon doesn’t reconnect on its own without clicking the rest button. Is there a work around for this?
You could go to your local Fablab and print your enclosure on a 3d printer 
Yes, you can use all the fancy commands like WiFi.connect(), Particle.connect() whenever you find the device not connected either via !WiFi.ready() or !Particle.connected().
This has been discussed in this forum all over the place.
1 Like
got it…thanks @ScruffR - works perfect.
Does anyone know of any lightpipe connectors that work well with the photon board? Basically I’m looking for some ideas on how to see the connected status of the board outside of the enclosure. I found this thread but wasn’t sure if that is a good solution.
If you can’t find any, you can always hook up an LED of your own using the exposed pads on the bottom.
I’m trying to get an external status LED, so I soldered three leads to the LED pads on the bottom of the photon. Looking at the schematics I presumed I needed a common anode RGB LED with 1k resistors, but it doesn’t seem to work. I double checked the leads with a meter and they are functioning, so I know its not the soldering.
I connected the anode pin to VIN, and each of the leads to the corresponding RGB pin. Should I be using a common cathode LED instead?
@james211 I use this lightpipe with success. Stick it or hover it close to the RGB LED and leads to a hole drilled in my enclosure. https://www.digikey.com/product-detail/en/bivar-inc/PLP2-1200/492-1530-ND/1790222
It transmits the color and intensity remarkably well.
Edit: Photo of lightpipe
You can also check out this post for detailed discussion for using an external status led: Bring Out Photon Buttons?
What LED are you using?
With a 1k resistor you need a rather modest one.
Standard green and blue sub LEDs in an RGB LED might have a forward voltage of 3.0~3.2V giving you only about 2mA when attached to 5V and powered off 3.3V not even 0.5mA.
1 Like
It’s a common anode RGB with forward voltage being 3.0-3.2V. Interestingly when I was playing around I accidentally touched one of the pins to ground and it lit up, but it doesn’t pulse.
If there is a specific recommendation for an LED that would be great.
I have tried light pipes, but for my configuration I need a flex pipe and there are no adapters that work well with the board.
Just try some smaller resistors to have about 20mA current throught each of the sub-LEDs
2 Likes
I have a website built that connects to the photon. Currently the user has to manually input their device ID and auth token. Does the Particle API allow for me to change that so the user just logs in using their Particle login and password and that connects my site to the Particle cloud? Does that make sense?
Take a look at the ParticleJS library 